


请先登录您的atyun账户,方可使用该功能

审核通过后即可使用此功能,请耐心等待~


探索现代C++中的卷积算法:深度学习的实用指南
2023年07月26日 由 Alex 发表
184339
0
介绍
在本文中,我们将学习如何使用简单而现代的C++来编码的深度学习算法,如卷积、反向传播、激活函数、优化器、深度神经网络等。
卷积
卷积是信号处理领域的老朋友。最初,它的定义如下:
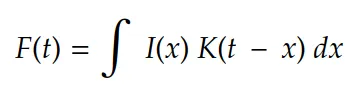
在机器学习术语中:
1. I(…)通常被称为输入
2. K(…)为核
3. F(…)作为I(x)给定K的特征映射。
考虑多维离散域,我们可以将积分转化为如下的求和:
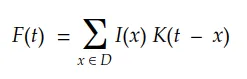
最后,对于二维数字图像,我们可以将其改写为:

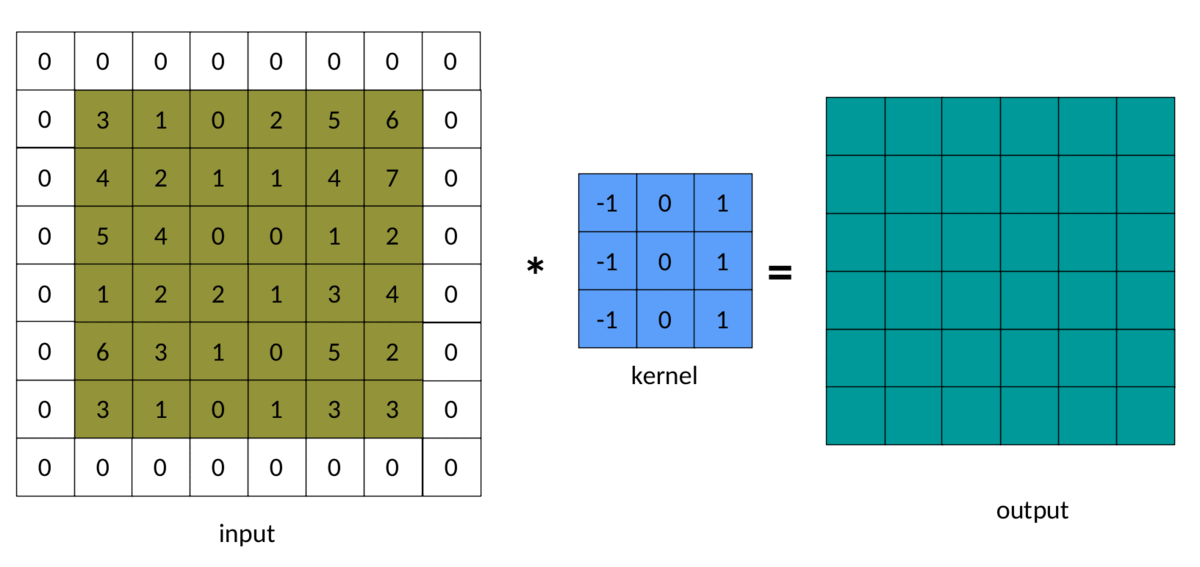
下面的例子是理解卷积的一个更简单的方法:
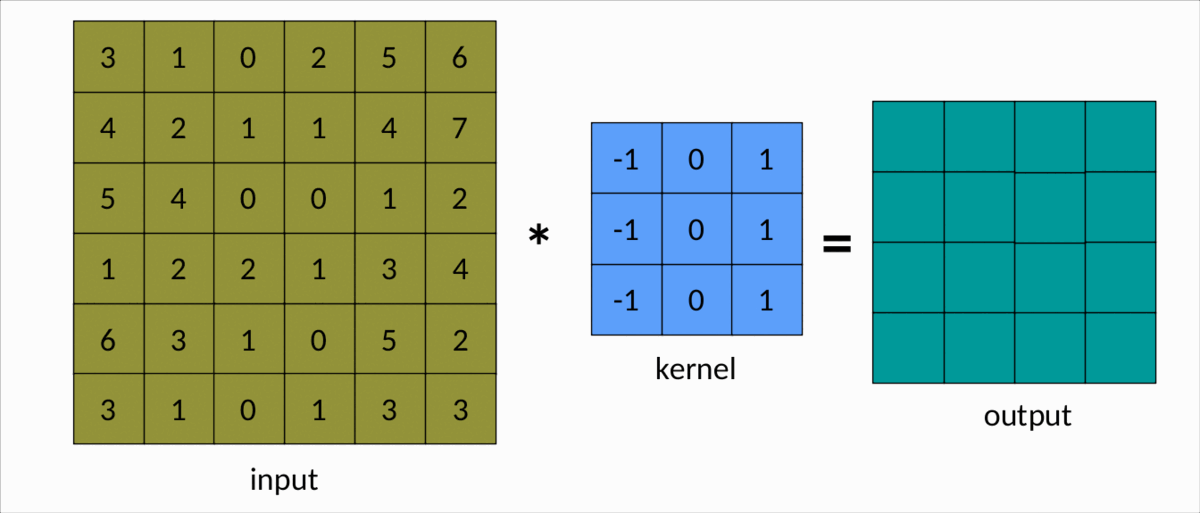
我们可以很容易地看到,卷积核在输入矩阵上滑动,生成另一个矩阵作为输出。这是卷积的简单情况,称为有效卷积。在这种情况下,输出矩阵的维度Output由以下公式决定:
dim(Output) = (m-k+1, n-k+1)
解析:
1. m和n分别是输入矩阵的行数和列数
2. k是平方核的大小。
使用循环编码2D卷积
实现卷积最直观的方法是使用循环:
auto Convolution2D = [](const Matrix &input, const Matrix &kernel)

{

    const int kernel_rows = kernel.rows();

    const int kernel_cols = kernel.cols();

    const int rows = (input.rows() - kernel_rows) + 1;

    const int cols = (input.cols() - kernel_cols) + 1;


    Matrix result = Matrix::Zero(rows, cols);


    for (int i = 0; i < rows; ++i)

    {

        for (int j = 0; j < cols; ++j)

        {

             double sum = input.block(i, j, kernel_rows, kernel_cols).cwiseProduct(kernel).sum();

             result(i, j) = sum;

        }

    }


    return result;

};
我们在列和行上滑动内核,对每一步应用内积。现在,我们可以这样简单地使用它:
#include
#include
using Matrix = Eigen::MatrixXd;
auto Convolution2D = ...;
int main(int, char **)
{
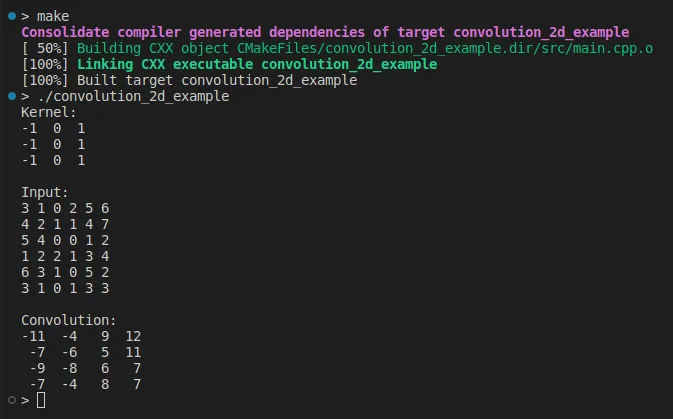
Matrix kernel(3, 3);
kernel <<
-1, 0, 1,
-1, 0, 1,
-1, 0, 1;
std::cout << "Kernel:\n" << kernel << "\n\n";
Matrix input(6, 6);
input << 3, 1, 0, 2, 5, 6,
4, 2, 1, 1, 4, 7,
5, 4, 0, 0, 1, 2,
1, 2, 2, 1, 3, 4,
6, 3, 1, 0, 5, 2,
3, 1, 0, 1, 3, 3;
std::cout << "Input:\n" << input << "\n\n";
auto output = Convolution2D(input, kernel);
std::cout << "Convolution:\n" << output << "\n";
return 0;
}
填充
在上面的例子中,我们注意到输出矩阵总是小于输入矩阵。有时,这种减少是好的,有时是坏的。我们可以通过在输入矩阵周围添加填充来避免这种减少:
卷积中padding的结果如下所示:
实现填充卷积的一种简单方法如下:
auto Convolution2D = [](const Matrix &input, const Matrix &kernel, int padding)

{

     int kernel_rows = kernel.rows();

     int kernel_cols = kernel.cols();

     int rows = input.rows() - kernel_rows + 2*padding + 1;

     int cols = input.cols() - kernel_cols + 2*padding + 1;


     Matrix padded = Matrix::Zero(input.rows() + 2*padding, input.cols() + 2*padding);

     padded.block(padding, padding, input.rows(), input.cols()) = input;


     Matrix result = Matrix::Zero(rows, cols);


     for(int i = 0; i < rows; ++i)

     {

         for(int j = 0; j < cols; ++j)

         {

             double sum = padded.block(i, j, kernel_rows, kernel_cols).cwiseProduct(kernel).sum();

             result(i, j) = sum;

         }

     }


     return result;

};
这段代码很简单,但内存使用成本高。注意,我们正在对输入矩阵进行完整的复制,以创建一个填充版本:
Matrix padded = Matrix::Zero(input.rows() + 2*padding, input.cols() + 2*padding);

padded.block(padding, padding, input.rows(), input.cols()) = input;
更好的解决方案是使用指针来控制切片和内核边界:
auto Convolution2D_v2 = [](const Matrix &input, const Matrix &kernel, int padding)

{

     const int input_rows = input.rows();

     const int input_cols = input.cols();

     const int kernel_rows = kernel.rows();

     const int kernel_cols = kernel.cols();


     if (input_rows < kernel_rows) throw std::invalid_argument("The input has less rows than the kernel");

     if (input_cols < kernel_cols) throw std::invalid_argument("The input has less columns than the kernel");


     const int rows = input_rows - kernel_rows + 2*padding + 1;

     const int cols = input_cols - kernel_cols + 2*padding + 1;


     Matrix result = Matrix::Zero(rows, cols);


     auto fit_dims = [&padding](int pos, int k, int length)

     {

          int input = pos - padding;

          int kernel = 0;

          int size = k;

          if (input < 0)

          {

              kernel = -input;

              size += input;

              input = 0;

          }

          if (input + size > length)

          {

              size = length - input;

          }

          return std::make_tuple(input, kernel, size);

     };


     for(int i = 0; i < rows; ++i)

     {

          const auto [input_i, kernel_i, size_i] = fit_dims(i, kernel_rows, input_rows);

          for(int j = 0; size_i > 0 && j < cols; ++j)

          {

               const auto [input_j, kernel_j, size_j] = fit_dims(j, kernel_cols, input_cols);

               if (size_j > 0)

               {

                    auto input_tile = input.block(input_i, input_j, size_i, size_j);

                    auto input_kernel = kernel.block(kernel_i, kernel_j, size_i, size_j);

                    result(i, j) = input_tile.cwiseProduct(input_kernel).sum();

               }

          }

     }

     return result;

};
这段新代码要好得多,因为这里我们没有分配临时内存来保存填充的输入。然而,它仍然可以改进。调用input.block(…)和kernel.block(…)也会消耗内存。
一个解决方案是使用CwiseNullaryOp block(…)替换它们。
我们可以这样运行填充卷积:
#include


#include

using Matrix = Eigen::MatrixXd;

auto Convolution2D = ...; // or Convolution2D_v2


int main(int, char **)

{

    Matrix kernel(3, 3);

    kernel <<

        -1, 0, 1,

        -1, 0, 1,

        -1, 0, 1;

    std::cout << "Kernel:\n" << kernel << "\n\n";


    Matrix input(6, 6);

    input <<

        3, 1, 0, 2, 5, 6,

        4, 2, 1, 1, 4, 7,

        5, 4, 0, 0, 1, 2,

        1, 2, 2, 1, 3, 4,

        6, 3, 1, 0, 5, 2,

        3, 1, 0, 1, 3, 3;

    std::cout << "Input:\n" << input << "\n\n";


    const int padding = 1;

    auto output = Convolution2D(input, kernel, padding);

    std::cout << "Convolution:\n" << output << "\n";


    return 0;

}
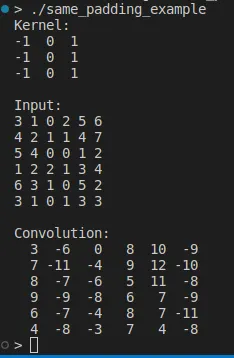
注意,现在输入和输出矩阵具有相同的维数。因此,它被称为same填充。默认填充模式,即不填充,通常称为有效填充。我们的代码允许相同的,有效的或任何非负填充。
内核
在深度学习模型中,核通常是奇数平方矩阵,如3x3、5x5、11x11等。有些核函数非常有名,比如Sobel的滤波器:

更容易看到每个 Sobel 过滤器对图像的影响:
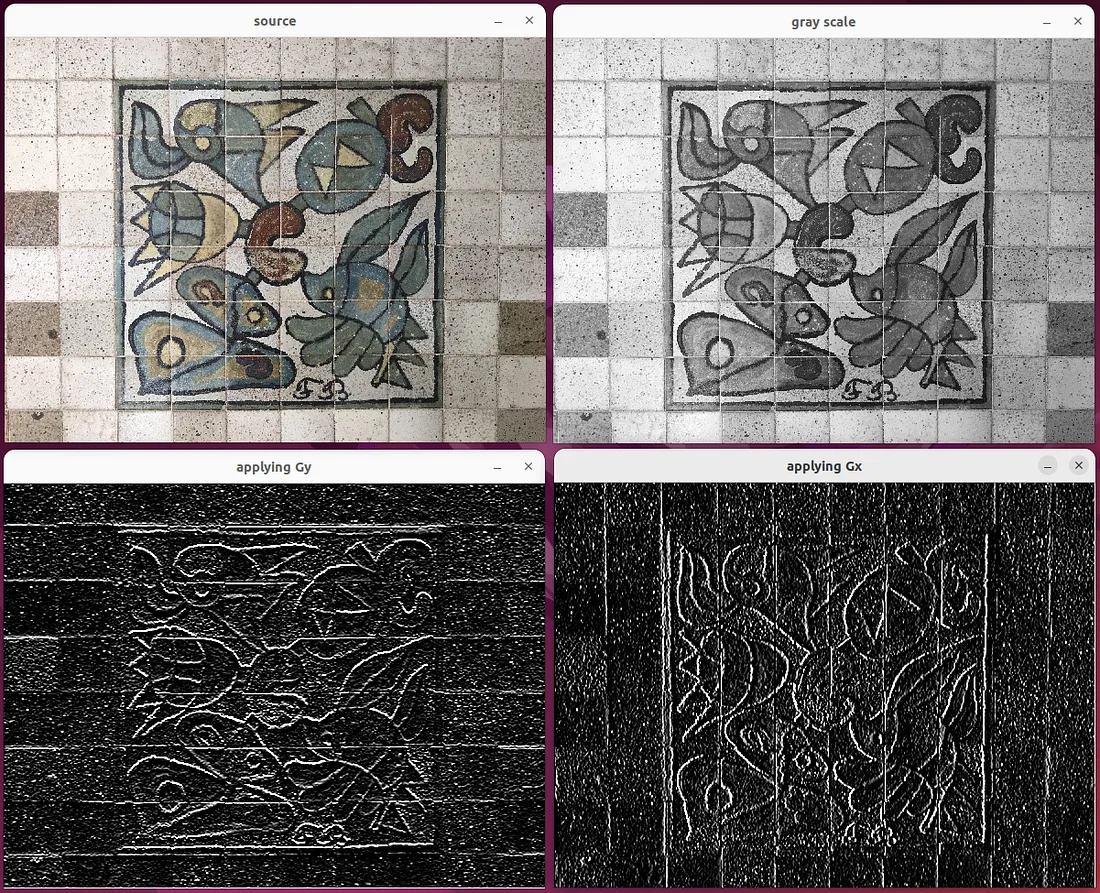
Gy表示水平边缘,Gx表示垂直边缘。因此, Sobel 核Gx和Gy通常被称为“边缘检测器”。
边缘是图像的基本特征,如纹理、亮度、颜色等。现代计算机视觉的关键是使用算法直接从数据中自动找到Sobel滤波器等核。或者,使用更好的术语,通过迭代训练过程拟合核。
结论
在本文中,我们编写了一个2D卷积,并使用Sobel滤波器作为将这个卷积应用于图像的示例。卷积在深度学习中起着核心作用。它们被广泛应用于当今每个实际机器学习模型中。
参考资料
1. 《深度学习卷积算法指南》
2. 《深度学习书籍》,Goodfellow
3. 《神经网络和深度学习:教科书》,Aggarwal
4. 《计算机视觉:算法与应用》,Szeliski
5. 《信号与系统》,Roberts
来源:https://medium.com/towards-artificial-intelligence/deep-learning-from-scratch-in-modern-c-convolutions-5c55598473e9

欢迎关注ATYUN官方公众号
商务合作及内容投稿请联系邮箱:bd@atyun.com


广告


写评论取消
回复取消