


将设计模型转化为深度学习代码的几种方法
去年,Tony Beltramelli发表了pix2code论文,Airbnb推出了sketch2code。
目前,自动化前端开发的最大障碍是计算能力。然而,我们可以使用目前的深度学习算法,以及综合的训练数据,开始探索人工前端自动化。
在这篇文章中,我们将利用神经网络根据设计模型的图像来编写一个基本的HTML和CSS网站。下面是这个过程的一个简要概述:
1)将设计图像交给预先训练的神经网络。
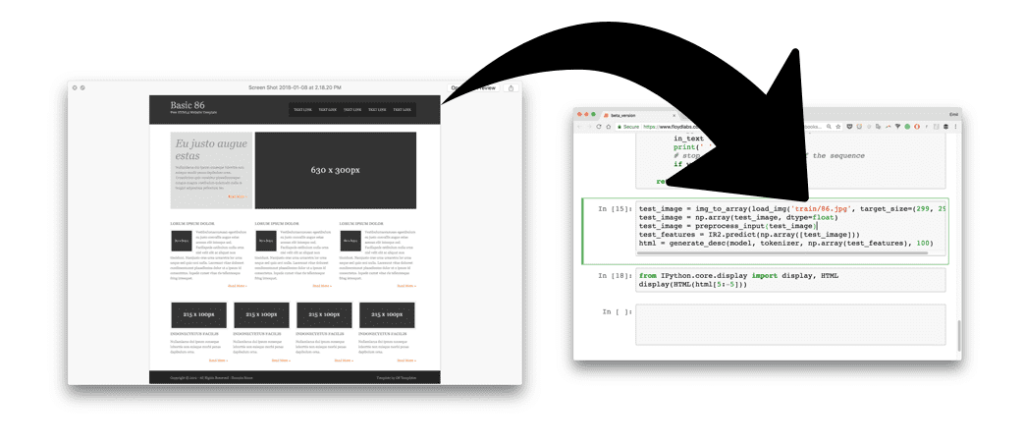
2)神经网络将图像转换成HTML标记。
3)渲染输出.
我们将在三个迭代中建立神经网络。
在第一个版本中,我们将制作一个最低限度的版本来获得移动部件的中止。第二个版本,HTML,将集中于自动化所有的步长和解释神经网络层。在最终版本Bootstrap中,我们将创建一个模型,该模型可以泛化并探索LSTM层。
所有的代码都是在Github和FloydHub的Jupyter notebook上编写的。所有的FloydHub notebook都在FloydHub目录中,本地的对应项都在local目录下。
Github地址:https://github.com/emilwallner/Screenshot-to-code-in-Keras/blob/master/README.md
FloydHub地址:https://www.floydhub.com/emilwallner/projects/picturetocode
这些模型是基于Beltramelli的pix2code论文和Jason Brownlee的图像标题教程。代码是用Python和Keras编写的,这是在TensorFlow上的一个框架。
pix2code论文地址:https://arxiv.org/abs/1705.07962
图像标题教程地址:https://machinelearningmastery.com/blog/page/2/
如果你是新手,我建议你去感受一下Python、反向传播和卷积神经网络。建议读以下文章 [1][2] [3]。
[1]地址:https://blog.floydhub.com/my-first-weekend-of-deep-learning/
[2]地址:https://blog.floydhub.com/coding-the-history-of-deep-learning/
[3]地址:https://blog.floydhub.com/colorizing-b&w-photos-with-neural-networks/
核心逻辑
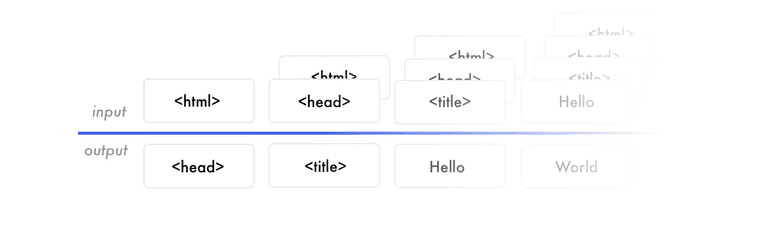
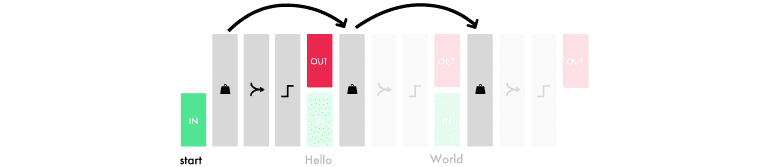
让我们来总结一下我们的目标。我们想构建一个神经网络,它将生成对应于屏幕截图的HTML/CSS标记。
当你训练神经网络时,输入几个匹配了HTML的屏幕截图。
它通过预测所有匹配的HTML标记标签逐个学习。当它预测下一个标记标签时,它将接收屏幕截图以及所有正确的标记标签。
这里是谷歌表中的一个简单的训练数据示例。
训练数据示例地址:https://docs.google.com/spreadsheets/d/1xXwarcQZAHluorveZsACtXRdmNFbwGtN3WMNhcTdEyQ/edit?usp=sharing
创建一个可以逐字预测的模型是现今最常用的方法。当然还有其他方法,但本教程中要使用这种方法。
注意,对于每个预测,它都得到相同的屏幕截图。因此,如果它必须预测20个单词,它将会得到20次相同的设计模型。现在,不用担心神经网络的工作原理,专注于理解神经网络的输入和输出。
注意前面的标记。我们训练网络预测句子“I can code”。当它收到“I”时,它就会预测“can”。下次它接收到“I can”时,预测结果将为“code”。它接收前半部分的单词,预测出接下来的单词。
从数据中来看,神经网络创造了特征。神经网络构建特征将输入数据与输出数据连接起来。它必须创建表示,以理解它所预测的屏幕截图(HTML语法)中的内容。这就构建了预测下一个标签的知识。
当你想要将训练过的模型用于实际使用时,过程与训练模型类似。每次使用相同的屏幕截图逐一生成文本。没有对它输入正确的HTML标记,而是接收目前生成的标记。然后预测下一个标记。这个预测是从“开始标签”开始,当它预测“结束标签”或者达到最大值时停止。这是谷歌表中的另一个例子。
谷歌示例地址:https://docs.google.com/spreadsheets/d/1yneocsAb_w3-ZUdhwJ1odfsxR2kr-4e_c5FabQbNJrs/edit?usp=sharing

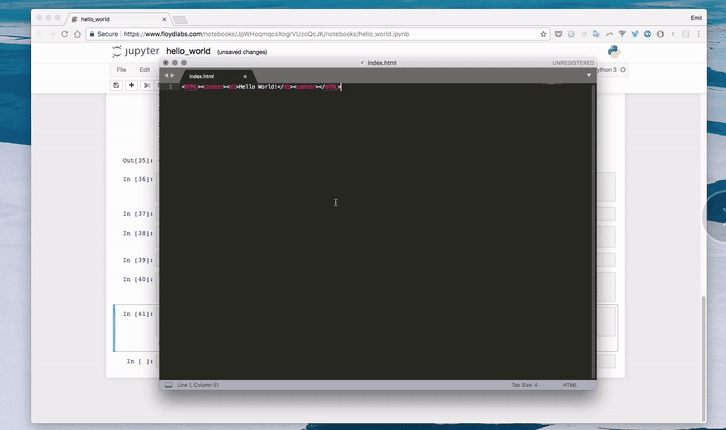
“hello world”版本
让我们构建一个hello world版本。我们将在神经网络输入一个显示为“hello world!”的截图,并教它如何生成标记。
首先,神经网络将设计模型映射到一个像素值列表中。从0到255的三个通道——红色、蓝色和绿色。

为了以神经网络理解的方式表示标记,我使用了独热编码。因此,“I can code”这个句子可以像下面这样映射。
热编码地址:https://machinelearningmastery.com/how-to-one-hot-encode-sequence-data-in-python/
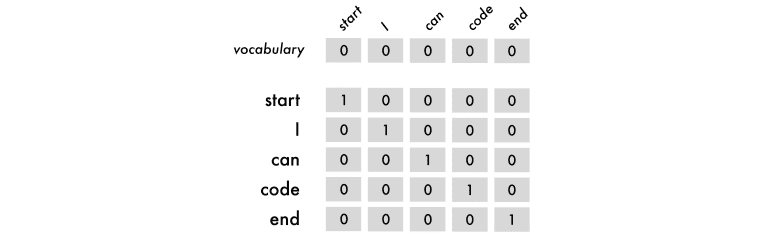
在上面的图形中,我们包括开始和结束标签。这些标签是用来提示网络何时开始预测和何时停止的。
对于输入数据,我们将使用句子,从第一个单词开始,然后逐字逐句地添加每个单词。输出数据总是一个单词。
句子遵循和单词一样的逻辑。它们也需要相同的输入长度。他们被句子最大长度限制,而不是词汇量。如果它比最大长度短,就用空格填满,一个字就是一个空格。
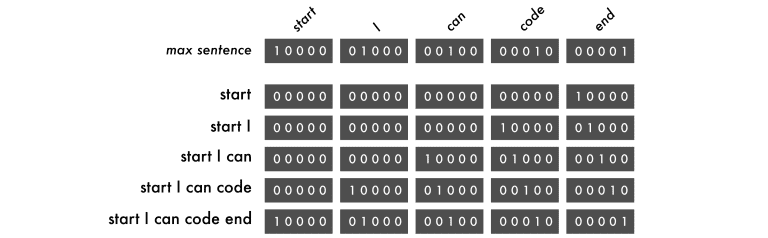
文字是从右到左输出。这迫使每个单词在每个训练回合中改变位置。这使得模型可以学习序列而不是记住每个单词的位置。
在下图中有四个预测。每一行都是一个预测。左边是三个颜色通道表示的图像:红色、绿色和蓝色,以及之前的单词。括号是预测结果,最后以一个红方块为结尾。

    #Length of longest sentence

    max_caption_len = 3

    #Size of vocabulary

    vocab_size = 3


    # Load one screenshot for each word and turn them into digits

    images = []

    for i in range(2):

        images.append(img_to_array(load_img('screenshot.jpg', target_size=(224, 224))))

    images = np.array(images, dtype=float)

    # Preprocess input for the VGG16 model

    images = preprocess_input(images)


    #Turn start tokens into one-hot encoding

    html_input = np.array(

                [[[0., 0., 0.], #start

                 [0., 0., 0.],

                 [1., 0., 0.]],

                 [[0., 0., 0.], #start Hello World!

                 [1., 0., 0.],

                 [0., 1., 0.]]])


    #Turn next word into one-hot encoding

    next_words = np.array(

                [[0., 1., 0.], # Hello World!

                 [0., 0., 1.]]) # end


    # Load the VGG16 model trained on imagenet and output the classification feature

    VGG = VGG16(weights='imagenet', include_top=True)

    # Extract the features from the image

    features = VGG.predict(images)


    #Load the feature to the network, apply a dense layer, and repeat the vector

    vgg_feature = Input(shape=(1000,))

    vgg_feature_dense = Dense(5)(vgg_feature)

    vgg_feature_repeat = RepeatVector(max_caption_len)(vgg_feature_dense)

    # Extract information from the input seqence

    language_input = Input(shape=(vocab_size, vocab_size))

    language_model = LSTM(5, return_sequences=True)(language_input)


    # Concatenate the information from the image and the input

    decoder = concatenate([vgg_feature_repeat, language_model])

    # Extract information from the concatenated output

    decoder = LSTM(5, return_sequences=False)(decoder)

    # Predict which word comes next

    decoder_output = Dense(vocab_size, activation='softmax')(decoder)

    # Compile and run the neural network

    model = Model(inputs=[vgg_feature, language_input], outputs=decoder_output)

    model.compile(loss='categorical_crossentropy', optimizer='rmsprop')


    # Train the neural network

    model.fit([features, html_input], next_words, batch_size=2, shuffle=False, epochs=1000)
在hello world版本中,我们使用三个标记:“start”,“hello world!”和“end”。标记可以是任何东西。它可以是一个字符,一个单词或一个句子。字符版本需要较小的词汇量,但这也限制了神经网络。单词级别的标记往往表现最好。
这里我们做预测:
# Create an empty sentence and insert the start token
sentence = np.zeros((1, 3, 3)) # [[0,0,0], [0,0,0], [0,0,0]]
start_token = [1., 0., 0.] # start
sentence[0][2] = start_token # place start in empty sentence
# Making the first prediction with the start token
second_word = model.predict([np.array([features[1]]), sentence])
# Put the second word in the sentence and make the final prediction
sentence[0][1] = start_token
sentence[0][2] = np.round(second_word)
third_word = model.predict([np.array([features[1]]), sentence])
# Place the start token and our two predictions in the sentence
sentence[0][0] = start_token
sentence[0][1] = np.round(second_word)
sentence[0][2] = np.round(third_word)
# Transform our one-hot predictions into the final tokens
vocabulary = ["start", "Hello World!
for i in sentence[0]:
print(vocabulary[np.argmax(i)], end=' ')输出
- 10 epochs:
start start start - 100 epochs:
startHello World!
Hello World!
- 300 epochs:
startHello World!
我犯的错误:
在收集数据之前构建第一个工作版本。在这个项目的早期,我设法得到了Geocities主机托管网站的旧档案。它有3800万个网站。由于被潜在的因素所蒙蔽,我忽略了减少100k字汇所需要的巨大的工作量。
处理一个tb级的数据需要好的硬件或大量的耐心。在我的mac遇到几个问题之后,我最终使用了一个强大的远程服务器。希望租用一个带有8个现代CPU核心和1GPS网络连接的平台,以拥有一个体面的工作流程。
理解输入和输出数据。输入X是屏幕截图和以前的标记标签。输出Y是下一个标签。当我了解这个的时候,就更容易理解他们之间的一切。也更容易尝试不同的架构。
注意兔子洞(rabbit holes)。因为这个项目与很多深入学习的领域交叉,我遇到了很多的兔子洞。花了一个星期的时间从头开始编写RNNs,沉醉于嵌入向量空间,并被奇异的实现所吸引。
图像到代码网络是伪装的图像标题模型。即使我知道了这一点,我仍然忽略了许多图像标题的文章,仅仅是因为它们不够吸引我。
在FloydHub上运行代码
FloydHub是一个深度学习训练平台。当我第一次开始学习深度学习的时候,我就用它们来训练和管理我的深度学习实验。你可以在10分钟内安装它并运行你的第一个模型。它是在云GPU上运行模型的最佳选项。
如果你是使用FloydHub的新手,请执行他们的2分钟安装或5分钟的演练。
2分钟安装地址:https://www.floydhub.com/
5分钟演练地址:https://www.youtube.com/watch?v=byLQ9kgjTdQ&t=21s
复制资源库。
git clone https://github.com/emilwallner/Screenshot-to-code-in-Keras.git登录并启动FloydHub命令行工具。
cd Screenshot-to-code-in-Keras

floyd login

floyd init s2c
在FloydHub云GPU机器上运行Jupyter notebook:
floyd run --gpu --env tensorflow-1.4 --data emilwallner/datasets/imagetocode/2:data --mode jupyter所有的Jupyter notebook都是在floydhub目录中编写的。local equivalent在本地目录下。一旦运行,你可以在这里找到第一个notebook:floydhub/Helloworld/helloworld.ipynb。
如果你想要更详细的说明和解释,请查看我之前的文章。
文章地址:https://blog.floydhub.com/colorizing-b&w-photos-with-neural-networks/
HTML版本
在这个版本中,我们将自动执行Hello World模型中的许多步骤。本节将重点介绍如何在神经网络中创建可伸缩的实现和移动的部分。
这个版本无法从随机网站预测HTML,但它仍然是探索动力学问题的一个很好的设置。
概述
如果我们展开前一个图形的组成部分,它是这样的。
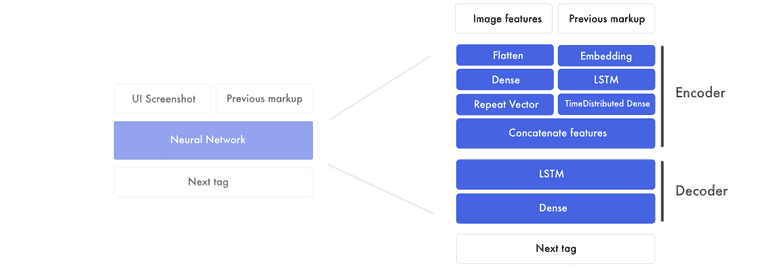
有两个主要部分。首先,编码器。这是我们创建图像特征和以前的标记特性的地方。特征是网络创建的构建块,用于将设计模型与标记连接起来。在编码器的末尾,我们将图像的特征与以前标记的每个单词粘在一起。
然后,解码器采用组合设计和标记功能,创建下一个标签特征。该特征通过一个完全连接的神经网络来预测下一个标签。
设计模型特性
由于我们需要为每个单词插入一个屏幕截图,因此在训练网络时这将成为一个障碍(示例)。我们不使用图像,而是提取需要生成标记的信息。
障碍示例:https://docs.google.com/spreadsheets/d/1xXwarcQZAHluorveZsACtXRdmNFbwGtN3WMNhcTdEyQ/edit#gid=0
信息被编码成图像特征。这是通过使用预先训练的卷积神经网络(CNN)完成的。该模型是在Imagenet上预先训练的。
我们在最终分类之前从图层中提取特征。

我们最终得到了1536个被称为特征的8像素图像。虽然我们很难理解它们,但是神经网络可以从这些特征中提取出这些元素的目标和位置。
标记特征
在hello world版本中,我们使用了独热编码来表示标记。在这个版本中,我们将使用字嵌入输入,并保持独热编码的输出。
我们构造每个句子的方式保持不变,但是我们映射每个标记的方法会发生变化。独热编码将每个单词视为一个独立的单元。我们将输入数据中的每个单词转换为数字列表。

这个单词嵌入的维度是8,但根据词汇的大小,通常会在50 - 500之间变化。
每个单词的8个数字是类似于一个vanilla神经网络的权值。他们被用于表示单词之间的关系。
这就是我们标记特征的方法。特征是神经网络开发用来将输入数据与输出数据连接起来的东西。
编码器
我们将使用词嵌入,并通过LSTM运行它们,并返回一个标记特征序列。这些都要经过时间分布的密集层——把它想象成一个有多个输入和输出的密集层。
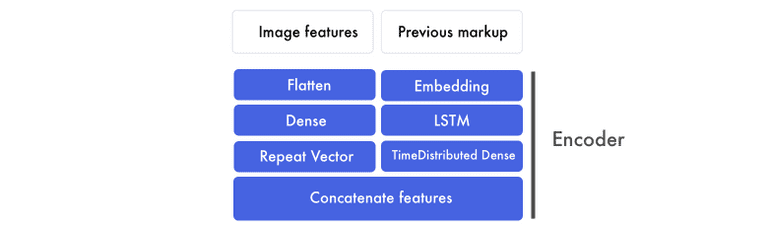
与此同时,图像特征首先被平面化。不管这些数字是如何被转换成一大堆数字列表的。我们在这个层上应用一个密集层来形成一个高级特征。然后将这些图像特征连接到标记特征。
这可能很难理解,所以让我们把它分解开。
标记特征
我们通过LSTM层运行词嵌入。在这个图形中,所有的句子都被添加到三个标记的容量上限。
为了混合信号并找到高级模式,我们将一个TimeDistributed密集层应用于标记特征。TimeDistributed密集与密集层相同,但有多个输入和输出。
图像特征
同时,我们准备图像。我们获取所有的微型图像特征,并转换成一个长列表。信息没有改变,只是重新组织。

再一次,为了混合信号和提取更高级的概念,我们应用了一个密集层。因为我们只处理一个输入值,所以我们可以使用一个密集层。为了将图像特性连接到标记特性,我们复制了图像特征。
在本例中,我们有三个标记特征。因此,我们最终得到了相同数量的图像特征和标记特征。
连接图像和标记特性
所有的句子都是padd用来创建三个标记特征的。我们已经准备好了图像特征,现在可以为每个标记特征添加一个图像特征。

在将图像特性粘贴到每个标记特性之后,我们最终得到了三个图像标记特征。这是我们将要添加到解码器的输入。
解码器
在这里,我们使用组合的图像标记特征来预测下一个标签。
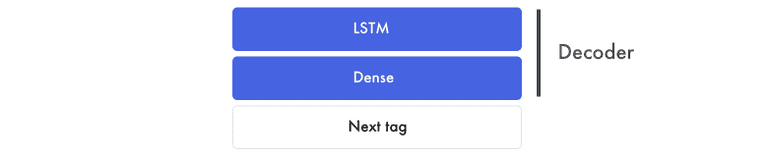
在下面的示例中,我们使用了三个图像标记特征对,并输出下一个标记特征。
注意,LSTM层的序列设置为false。它只预测一个特征。在我们的示例中,下一个标签特征包含了最终的预测信息。

最终预测
密集层就像传统的前馈神经网络。它连接了下一个标签特性中的512位数字与4个最终预测。在我们的词汇表中有4个单词: start, hello, world, end。
词汇预测可以是[0.1,0.1,0.1,0.7]。密集层的softmax激活的分布概率为0 - 1,所有预测的概率总和为1。在该示例中,它预测第4个单词是下一个标签。然后将一个热编码(0,0,0,1)转换为映射的值,比如“end”。
 # Load the images and preprocess them for inception-resnet

    images = []

    all_filenames = listdir('images/')

    all_filenames.sort()

    for filename in all_filenames:

        images.append(img_to_array(load_img('images/'+filename, target_size=(299, 299))))

    images = np.array(images, dtype=float)

    images = preprocess_input(images)


    # Run the images through inception-resnet and extract the features without the classification layer

    IR2 = InceptionResNetV2(weights='imagenet', include_top=False)

    features = IR2.predict(images)


    # We will cap each input sequence to 100 tokens

    max_caption_len = 100

    # Initialize the function that will create our vocabulary

    tokenizer = Tokenizer(filters='', split=" ", lower=False)


    # Read a document and return a string

    def load_doc(filename):

        file = open(filename, 'r')

        text = file.read()

        file.close()

        return text


    # Load all the HTML files

    X = []

    all_filenames = listdir('html/')

    all_filenames.sort()

    for filename in all_filenames:

        X.append(load_doc('html/'+filename))


    # Create the vocabulary from the html files

    tokenizer.fit_on_texts(X)


    # Add +1 to leave space for empty words

    vocab_size = len(tokenizer.word_index) + 1

    # Translate each word in text file to the matching vocabulary index

    sequences = tokenizer.texts_to_sequences(X)

    # The longest HTML file

    max_length = max(len(s) for s in sequences)


    # Intialize our final input to the model

    X, y, image_data = list(), list(), list()

    for img_no, seq in enumerate(sequences):

        for i in range(1, len(seq)):

            # Add the entire sequence to the input and only keep the next word for the output

            in_seq, out_seq = seq[:i], seq[i]

            # If the sentence is shorter than max_length, fill it up with empty words

            in_seq = pad_sequences([in_seq], maxlen=max_length)[0]

            # Map the output to one-hot encoding

            out_seq = to_categorical([out_seq], num_classes=vocab_size)[0]

            # Add and image corresponding to the HTML file

            image_data.append(features[img_no])

            # Cut the input sentence to 100 tokens, and add it to the input data

            X.append(in_seq[-100:])

            y.append(out_seq)


    X, y, image_data = np.array(X), np.array(y), np.array(image_data)


    # Create the encoder

    image_features = Input(shape=(8, 8, 1536,))

    image_flat = Flatten()(image_features)

    image_flat = Dense(128, activation='relu')(image_flat)

    ir2_out = RepeatVector(max_caption_len)(image_flat)


    language_input = Input(shape=(max_caption_len,))

    language_model = Embedding(vocab_size, 200, input_length=max_caption_len)(language_input)

    language_model = LSTM(256, return_sequences=True)(language_model)

    language_model = LSTM(256, return_sequences=True)(language_model)

    language_model = TimeDistributed(Dense(128, activation='relu'))(language_model)


    # Create the decoder

    decoder = concatenate([ir2_out, language_model])

    decoder = LSTM(512, return_sequences=False)(decoder)

    decoder_output = Dense(vocab_size, activation='softmax')(decoder)


    # Compile the model

    model = Model(inputs=[image_features, language_input], outputs=decoder_output)

    model.compile(loss='categorical_crossentropy', optimizer='rmsprop')


    # Train the neural network

    model.fit([image_data, X], y, batch_size=64, shuffle=False, epochs=2)


    # map an integer to a word

    def word_for_id(integer, tokenizer):

        for word, index in tokenizer.word_index.items():

            if index == integer:

                return word

        return None


    # generate a description for an image

    def generate_desc(model, tokenizer, photo, max_length):

        # seed the generation process

        in_text = 'START'

        # iterate over the whole length of the sequence

        for i in range(900):

            # integer encode input sequence

            sequence = tokenizer.texts_to_sequences([in_text])[0][-100:]

            # pad input

            sequence = pad_sequences([sequence], maxlen=max_length)

            # predict next word

            yhat = model.predict([photo,sequence], verbose=0)

            # convert probability to integer

            yhat = np.argmax(yhat)

            # map integer to word

            word = word_for_id(yhat, tokenizer)

            # stop if we cannot map the word

            if word is None:

                break

            # append as input for generating the next word

            in_text += ' ' + word

            # Print the prediction

            print(' ' + word, end='')

            # stop if we predict the end of the sequence

            if word == 'END':

                break

        return


    # Load and image, preprocess it for IR2, extract features and generate the HTML

    test_image = img_to_array(load_img('images/87.jpg', target_size=(299, 299)))

    test_image = np.array(test_image, dtype=float)

    test_image = preprocess_input(test_image)

    test_features = IR2.predict(np.array([test_image]))

    generate_desc(model, tokenizer, np.array(test_features), 100)
输出
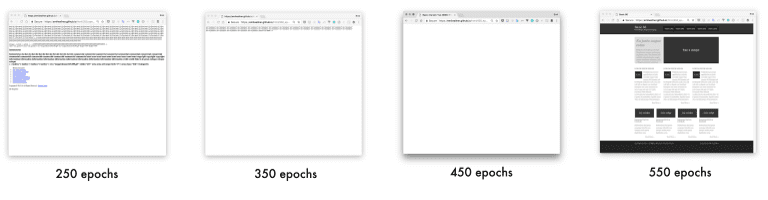
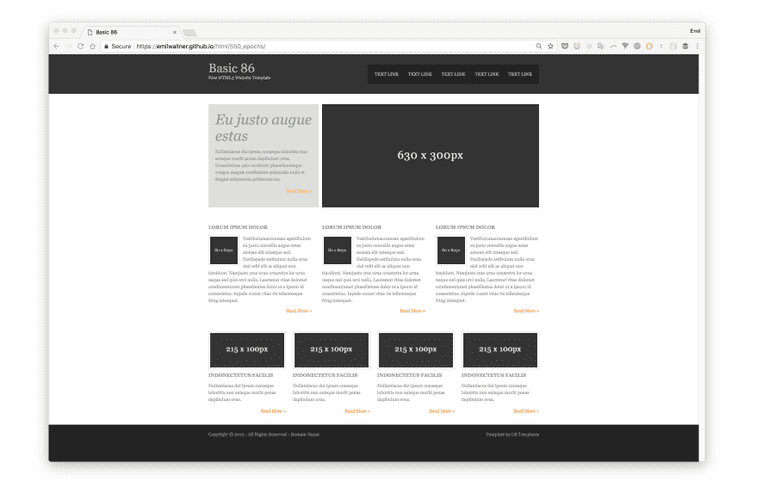
生成网站链接
地址:https://emilwallner.github.io/html/250_epochs/
地址:https://emilwallner.github.io/html/350_epochs/
地址:https://emilwallner.github.io/html/450_epochs/
地址:https://emilwallner.github.io/html/550_epochs/
如果你在点击这些链接时看不到任何东西,你可以右键点击“查看页面源代码”。这是原始网站提供的参考。
我犯的错误:
- 与CNNs相比,LSTM对认知功能更重要。当我打开所有的LSTM时,它们更容易理解。 RNN上的Fast.ai的视频非常有用。另外,在尝试理解它们的工作原理之前,首先要了解输入和输出特征。
视频地址:http://course.fast.ai/lessons/lesson6.html
- 从头开始构建词汇比缩小词汇量要容易得多。这包括从字体、div大小、十六进制颜色到变量名和普通单词的所有内容。
- 大多数库是用来解析文本文档而不是代码。在文档中,所有东西都由空格分隔,但是在代码中,需要自定义解析。
- 可以通过在Imagenet上训练的模型提取特性。这似乎是不能的,因为Imagenet很少有web图像。但是,相比于从头开始训练的pix2code模型,损失要高出30%。我对使用基于web屏幕截图的预先训练的基于感知器的模型很感兴趣。
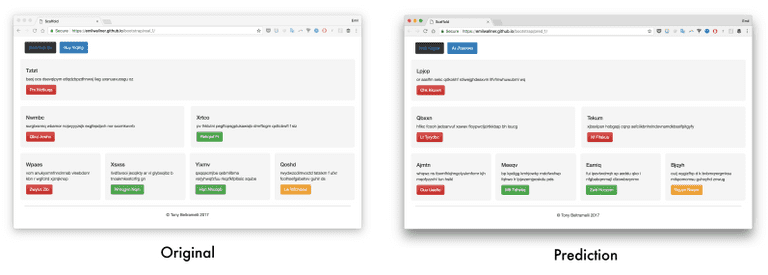
Bootstrap版本
在我们的最终版本中,我们将使用来自pix2code论文的生成的Bootstrap网站的数据集。通过使用Twitter的引导,我们可以结合HTML和CSS,减少词汇量。
pix2code论文地址:https://arxiv.org/abs/1705.07962
我们将使它能够生成它之前未见过的屏幕截图标记。我们还将深入了解它是如何构建屏幕截图和标记的常识。
我们将使用17个简化标记,然后将它们转换成HTML和CSS,而不是在Bootstrap上进行训练。数据集包括1500个测试截图和250个验证图像。对于每个屏幕截图平均有65个标签,共有96925个训练示例。
数据集地址:https://github.com/tonybeltramelli/pix2code/tree/master/datasets
通过对pix2code论文中的模型进行调整,该模型预测web组件的准确率可以达到97%(BLEU 4-ngram greedy搜索,稍后会详细介绍)。
端到端的方法
从预先训练的模型中提取特征可以很好地应用于图像标题模型。但经过几次实验,我意识到pix2code的端到端方法对这个问题更有效。预先训练的模型没有在web数据上进行训练,而是为分类定制的。
在这个模型中,我们用一个较轻的卷积神经网络代替了预先训练的图像特征。我们不使用max-pooling来增加信息密度,而是增加了跨步。这保持了前端元素的位置和颜色。

有两种核心模型可用:卷积神经网络(CNN)和递归神经网络(RNN)。最常见的递归神经网络是长期短期记忆(LSTM)。
有很多很棒的CNN教程,我在前一篇文章中介绍过。在这里,我将主要介绍LSTM。
文章地址:https://blog.floydhub.com/colorizing-b&w-photos-with-neural-networks/
理解LSTM的时间步
LSTM的难点之一是时间步。一个vanilla神经网络可以被认为有两个时间步。如果你给它“Hello”,它会预测出“World”。但它很难再预测更多的时间步。在下面的示例中,输入有4个时间步,每个时间步包含一个词。
LSTM利用时间步进行输入。我们的模型看起来是这样的:每个向下的步骤,都有相同的权值。将一组权值应用到前面的输出,另一组用于新的输入。
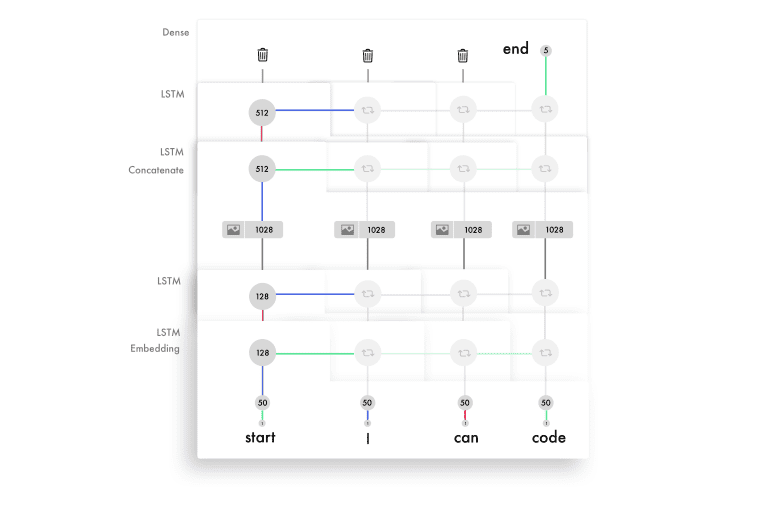
将加权输入和输出连接起来,再加上一个激活,这是时间步的输出。由于我们重用了权值,它们从多个输入中提取信息,并构建了序列的知识。
下面是LSTM中每个时间步的简化版本。
为了理解这个逻辑,我建议学习Andrew Trask的教程从头开始构建一个RNN。
教程地址:https://iamtrask.github.io/2015/11/15/anyone-can-code-lstm/
理解LSTM层中的单元
每个LSTM层的单元数量决定了它的记忆能力。这也对应每个输出特征的大小。同样,一个特征是一长串用于在层之间传输信息的数字。
LSTM层中的每个单元都学习跟踪语法的不同方面。下面是单元的可视化示例,它跟踪行div中的信息。这是我们用来训练bootstrap模型的简化标记。

每个LSTM单元保持储存格状态。把储存格状态当做记忆。权值和激活被用来以不同的方式修改状态。这使得LSTM层可以对每个输入保留和删除的信息进行微调。
除了传递每个输入的输出特征外,它还会转发储存格状态,在LSTM中每个单元都有一个值。如果想了解LSTM中的组件是如何交互的,我推荐Colah的教程、Jayasiri的Numpy实现,以及Karphay的演讲和文章。
Colah的教程地址:https://colah.github.io/posts/2015-08-Understanding-LSTMs/
Jayasiri的Numpy实现地址:http://blog.varunajayasiri.com/numpy_lstm.html
演讲地址:https://www.youtube.com/watch?v=yCC09vCHzF8
文章地址:https://karpathy.github.io/2015/05/21/rnn-effectiveness/
dir_name = 'resources/eval_light/'


    # Read a file and return a string

    def load_doc(filename):

        file = open(filename, 'r')

        text = file.read()

        file.close()

        return text


    def load_data(data_dir):

        text = []

        images = []

        # Load all the files and order them

        all_filenames = listdir(data_dir)

        all_filenames.sort()

        for filename in (all_filenames):

            if filename[-3:] == "npz":

                # Load the images already prepared in arrays

                image = np.load(data_dir+filename)

                images.append(image['features'])

            else:

                # Load the boostrap tokens and rap them in a start and end tag

                syntax = ' ' + load_doc(data_dir+filename) + ' '

                # Seperate all the words with a single space

                syntax = ' '.join(syntax.split())

                # Add a space after each comma

                syntax = syntax.replace(',', ' ,')

                text.append(syntax)

        images = np.array(images, dtype=float)

        return images, text


    train_features, texts = load_data(dir_name)


    # Initialize the function to create the vocabulary

    tokenizer = Tokenizer(filters='', split=" ", lower=False)

    # Create the vocabulary

    tokenizer.fit_on_texts([load_doc('bootstrap.vocab')])


    # Add one spot for the empty word in the vocabulary

    vocab_size = len(tokenizer.word_index) + 1

    # Map the input sentences into the vocabulary indexes

    train_sequences = tokenizer.texts_to_sequences(texts)

    # The longest set of boostrap tokens

    max_sequence = max(len(s) for s in train_sequences)

    # Specify how many tokens to have in each input sentence

    max_length = 48


    def preprocess_data(sequences, features):

        X, y, image_data = list(), list(), list()

        for img_no, seq in enumerate(sequences):

            for i in range(1, len(seq)):

                # Add the sentence until the current count(i) and add the current count to the output

                in_seq, out_seq = seq[:i], seq[i]

                # Pad all the input token sentences to max_sequence

                in_seq = pad_sequences([in_seq], maxlen=max_sequence)[0]

                # Turn the output into one-hot encoding

                out_seq = to_categorical([out_seq], num_classes=vocab_size)[0]

                # Add the corresponding image to the boostrap token file

                image_data.append(features[img_no])

                # Cap the input sentence to 48 tokens and add it

                X.append(in_seq[-48:])

                y.append(out_seq)

        return np.array(X), np.array(y), np.array(image_data)


    X, y, image_data = preprocess_data(train_sequences, train_features)


    #Create the encoder

    image_model = Sequential()

    image_model.add(Conv2D(16, (3, 3), padding='valid', activation='relu', input_shape=(256, 256, 3,)))

    image_model.add(Conv2D(16, (3,3), activation='relu', padding='same', strides=2))

    image_model.add(Conv2D(32, (3,3), activation='relu', padding='same'))

    image_model.add(Conv2D(32, (3,3), activation='relu', padding='same', strides=2))

    image_model.add(Conv2D(64, (3,3), activation='relu', padding='same'))

    image_model.add(Conv2D(64, (3,3), activation='relu', padding='same', strides=2))

    image_model.add(Conv2D(128, (3,3), activation='relu', padding='same'))


    image_model.add(Flatten())

    image_model.add(Dense(1024, activation='relu'))

    image_model.add(Dropout(0.3))

    image_model.add(Dense(1024, activation='relu'))

    image_model.add(Dropout(0.3))


    image_model.add(RepeatVector(max_length))


    visual_input = Input(shape=(256, 256, 3,))

    encoded_image = image_model(visual_input)


    language_input = Input(shape=(max_length,))

    language_model = Embedding(vocab_size, 50, input_length=max_length, mask_zero=True)(language_input)

    language_model = LSTM(128, return_sequences=True)(language_model)

    language_model = LSTM(128, return_sequences=True)(language_model)


    #Create the decoder

    decoder = concatenate([encoded_image, language_model])

    decoder = LSTM(512, return_sequences=True)(decoder)

    decoder = LSTM(512, return_sequences=False)(decoder)

    decoder = Dense(vocab_size, activation='softmax')(decoder)


    # Compile the model

    model = Model(inputs=[visual_input, language_input], outputs=decoder)

    optimizer = RMSprop(lr=0.0001, clipvalue=1.0)

    model.compile(loss='categorical_crossentropy', optimizer=optimizer)


    #Save the model for every 2nd epoch

    filepath="org-weights-epoch-{epoch:04d}--val_loss-{val_loss:.4f}--loss-{loss:.4f}.hdf5"

    checkpoint = ModelCheckpoint(filepath, monitor='val_loss', verbose=1, save_weights_only=True, period=2)

    callbacks_list = [checkpoint]


    # Train the model

    model.fit([image_data, X], y, batch_size=64, shuffle=False, validation_split=0.1, callbacks=callbacks_list, verbose=1, epochs=50)
测试准确度
很难找到一种公平的方法来衡量准确度。如果你预测的是一个不同步的词,准确性可能为0%的。如果你删除一个与预测同步的单词,准确性可能会达到99%。
我使用了BLEU评分,它是验证机器翻译和图像标题模型的最佳方法。它将句子从1-4个词序列分成4个n-grams。在下面的预测中,“cat”应该是“code”。

为了得到最后的分数,你要将每一个分数乘以25%,, (4/5) * 0.25 + (2/4) * 0.25 + (1/3) * 0.25 + (0/2) * 0.25 = 0.2 + 0.125 + 0.083 + 0 = 0.408。然后乘以一个句子长度损失。因为我们例子中的长度是正确的,它成为我们的最终分数。
你可以增加n-gram的数目,使它更难。四个n-gram的模型是最适合人类转化的模型。我建议使用下面的代码运行几个示例,并阅读wiki。
wiki地址:https://en.wikipedia.org/wiki/BLEU
#Create a function to read a file and return its content
def load_doc(filename):
file = open(filename, 'r')
text = file.read()
file.close()
return text
def load_data(data_dir):
text = []
images = []
files_in_folder = os.listdir(data_dir)
files_in_folder.sort()
for filename in tqdm(files_in_folder):
#Add an image
if filename[-3:] == "npz":
image = np.load(data_dir+filename)
images.append(image['features'])
else:
# Add text and wrap it in a start and end tag
syntax = ' ' + load_doc(data_dir+filename) + ' '
#Seperate each word with a space
syntax = ' '.join(syntax.split())
#Add a space between each comma
syntax = syntax.replace(',', ' ,')
text.append(syntax)
images = np.array(images, dtype=float)
return images, text
#Intialize the function to create the vocabulary
tokenizer = Tokenizer(filters='', split=" ", lower=False)
#Create the vocabulary in a specific order
tokenizer.fit_on_texts([load_doc('bootstrap.vocab')])
dir_name = '../../../../eval/'
train_features, texts = load_data(dir_name)
#load model and weights
json_file = open('../../../../model.json', 'r')
loaded_model_json = json_file.read()
json_file.close()
loaded_model = model_from_json(loaded_model_json)
# load weights into new model
loaded_model.load_weights("../../../../weights.hdf5")
print("Loaded model from disk")
# map an integer to a word
def word_for_id(integer, tokenizer):
for word, index in tokenizer.word_index.items():
if index == integer:
return word
return None
print(word_for_id(17, tokenizer))
# generate a description for an image
def generate_desc(model, tokenizer, photo, max_length):
photo = np.array([photo])
# seed the generation process
in_text = ' '
# iterate over the whole length of the sequence
print('\nPrediction---->\n\n ' , end='')
for i in range(150):
# integer encode input sequence
sequence = tokenizer.texts_to_sequences([in_text])[0]
# pad input
sequence = pad_sequences([sequence], maxlen=max_length)
# predict next word
yhat = loaded_model.predict([photo, sequence], verbose=0)
# convert probability to integer
yhat = argmax(yhat)
# map integer to word
word = word_for_id(yhat, tokenizer)
# stop if we cannot map the word
if word is None:
break
# append as input for generating the next word
in_text += word + ' '
# stop if we predict the end of the sequence
print(word + ' ', end='')
if word == '' :
break
return in_text
max_length = 48
# evaluate the skill of the model
def evaluate_model(model, descriptions, photos, tokenizer, max_length):
actual, predicted = list(), list()
# step over the whole set
for i in range(len(texts)):
yhat = generate_desc(model, tokenizer, photos[i], max_length)
# store actual and predicted
print('\n\nReal---->\n\n' + texts[i])
actual.append([texts[i].split()])
predicted.append(yhat.split())
# calculate BLEU score
bleu = corpus_bleu(actual, predicted)
return bleu, actual, predicted
bleu, actual, predicted = evaluate_model(loaded_model, texts, train_features, tokenizer, max_length)
#Compile the tokens into HTML and css
dsl_path = "compiler/assets/web-dsl-mapping.json"
compiler = Compiler(dsl_path)
compiled_website = compiler.compile(predicted[0], 'index.html')
print(compiled_website )
print(bleu)输出
抽样输出链接
地址:https://emilwallner.github.io/bootstrap/real_1/
地址:https://emilwallner.github.io/bootstrap/real_2/
地址:https://emilwallner.github.io/bootstrap/pred_3/
地址:https://emilwallner.github.io/bootstrap/real_4/
地址:https://emilwallner.github.io/bootstrap/real_5/
我犯的错误:
- 应该理解模型的弱点,而不是测试随机模型。首先,我应用了一些随机的东西,比如批量标准化,双向网络,并尝试实现关注。在查看测试数据并发现它不能准确地预测颜色和位置后,我意识到CNN有一个弱点。这使我可以用更大的跨步来替换maxpooling。验证损失从0.12提高到0.02,BLEU评分从85%提高到97%。
- 如果数据集之间是相关的,只使用预先训练的模型。考虑到小数据集,我认为预先训练的图像模型可以提高性能。在我的实验中,端到端模型的速度较慢,需要更多的内存,但准确率超过30%。
- 当你在远程服务器上运行模型时,可能会有差异。在我的mac上,它按字母顺序读取文件。但是,在服务器上,它随机读取文件。这就造成了屏幕截图和代码之间的不匹配。它仍然收敛,但是验证数据比我修复它时要糟糕50%。
- 确保你已经理解了库函数。在你的词汇表中要包含空标记的空间。当我没有添加它时,它就不包含标签。我是在研究了几次最终输出之后才注意到它从来没有预测过“single”标记。在快速检查之后,我意识到它可能不在词汇表中。同样,在训练和测试词汇表中使用相同的顺序。
- 实验时使用较轻的模型。用GRU代替LSTM使每个epoch周期减少了30%,对性能没有很大的影响。
下一个步骤
前端开发是应用深度学习的理想空间。它很容易生成数据,并且当前的深度学习算法可以映射大部分的逻辑。
最令人兴奋的领域之一是在LSTM上应用注意力。这不仅能提高准确性,还能让我们看到CNN在生成标记时将焦点放在哪里。
LSTM上应用注意力地址:https://arxiv.org/pdf/1502.03044.pdf
注意力也是标记、样式表、脚本和最终后端之间通信的关键。注意力层可以跟踪变量,使网络能够在编程语言之间进行通信。
但是在最近的特性中,最大的影响将来自于构建一个可伸缩的方法来合成数据。然后可以一步一步地添加字体、颜色、文字和动画。
到目前为止,大多数的进展都是在将草图转化为模板应用程序的过程中发生的。在不到两年的时间里,我们就可以在纸上绘制出一个应用,在不到一秒的时间内就能得到相应的前端。Airbnb的设计团队和Uizard已经创建了两个技术原型。


