


请先登录您的atyun账户,方可使用该功能

审核通过后即可使用此功能,请耐心等待~


计算机视觉项目:用dlib进行单目标跟踪
2018年10月27日 由 yuxiangyu 发表
727155
0
本教程将教你如何使用dlib和Python执行目标跟踪(object tracking)。阅读今天的博客文章后,你将能够使用dlib跟踪实时视频中的目标。
过去,我们曾经讨论过质心跟踪(centroid tracking),这是一种简单而有效的方法,它可以(1)为图像中的每个目标(或者说对象)分配唯一的ID,然后(2)跟踪视频流中移动的每个对象和其关联的ID。
这种跟踪算法的最大缺点是,在大多数情况下,必须在每个输入帧上运行单独的对象检测器,这种行为作为对象检测器来说很不友善,运行起来计算成本很高(包括HOG +线性SVM,Faster R-CNNs和SSD)。
另一种方法是:
那么,这种方法可行吗?
答案是肯定的,特别是我们可以使用dlib的关联跟踪算法实现。在今天博文的剩余部分中,你将学习如何应用dlib的关联跟踪器在视频流中实时跟踪对象。
我们将从今天的教程开始,简要讨论dlib基于关联的目标跟踪的实现。
然后,我将向你展示如何在自己的应用程序中使用dlib的目标跟踪器。
最后,我们将讨论dlib的目标跟踪器的一些缺点和局限性。
DLIB关联跟踪器(correlation tracker)Danelljan等人的2014年论文《Accurate Scale Estimation for Robust Visual Tracking》实现。
论文:http://www.bmva.org/bmvc/2014/papers/paper038/index.html
同时,他们的工作建立在Bolme等人2010年的工作《Visual Object Tracking using Adaptive Correlation Filters》的基础上。虽然MOSSE跟踪器适用于平移,但应用于尺寸发生变化的物品上通常会失败。
论文:http://www.cs.colostate.edu/~vision/publications/bolme_cvpr10.pdf
Danelljan等人的工作。提出利用“scale pyramid”在找到最佳平移后准确估计物体的比例。这一突破使我们能够跟踪在平移和在整个视频流中进行缩放的对象 。此外,我们可以实时执行这个跟踪。
有关算法的详细介绍,请参阅上面论文链接。
要查看这个项目是如何组织的,只需在终端中使用tree命令:
我们有三个目录:
今天我们将回顾一个Python脚本: track_object .py 。
让我们继续使用dlib实现我们的目标跟踪器。
打开 track_object .py 并插入以下代码:
在这里我们导入我们所需的包如dlib、imutils和OpenCV。
接下来,让我们解析一下命令行参数
我们的脚本有四个必需的命令行参数:
还有两个可选的:
让我们定义这个模型支持的类,并从磁盘加载我们的网络:
我们将使用经过预训练的MobileNet SSD在单个帧中执行对象检测。接着,对象的位置将被传递给dlib的关联跟踪器,以便在视频的剩余帧中进行跟踪。
模型支持20个对象类(有一个背景类,第3-6行)。
注意: 如果使用的是其他Caffe模型,则需要重新定义CLASSES 列表。同样,如果使用本中包含的模型,请不要修改此列表。
在循环视频帧之前,我们需要将模型加载到内存中。这在第10行处理, 其中加载Caffe模型所需的prototxt和model文件的路径(两者都在我们的命令行args字典中提供)。
现在让我们执行重要的初始化,特别是我们的视频流:
我们的视频流, tracker和视频写入器(writer)对象在第4-6行初始化 。我们还在第7行初始化了文本标签label。
我们的每秒帧数估算器在第10行实例化 。
现在我们已准备好开始循环我们的视频帧:
我们在第2行开始while循环, 然后继续在第4行抓取一个frame。
我们的帧被调整大小,并交换颜色通道(第12和13行)。调整大小可以加快处理速度,你可以尝试使用帧尺寸(frame dimension)来获得更高的每秒帧数(FPS)。dlib需要转换为RGB色彩空间(OpenCV默认BGR)。
在运行时,可以通过命令行参数传递输出视频路径(视情况选择)。所以,如果有必要,我们将初始化我们的视频写入器 上 线17-20。有关使用OpenCV将视频写入磁盘的更多信息,请参阅:https://www.pyimagesearch.com/2016/02/22/writing-to-video-with-opencv/
接下来,我们需要检测一个跟踪对象(如果我们还没有):
如果我们的tracker对象为 None (第4行),我们首先需要检测输入帧中的对象 。为此,我们创建一个 blob (第7行)并通过网络传递它(第11和12行)。
我们 现在处理detections:
如果我们的物体探测器找到了若干对象(第2行),我们会抓取概率最大的对象(第8行)。
本文演示了如何使用dlib来执行单个目标跟踪,因此我们需要找到概率最高的检测对象(以后的博客文章将介绍使用dlib进行多目标跟踪)。
从那里,我们将获得了与对象相关的置信度(conf )和label(第12和13行)。
现在是时候过滤掉检测结果了。这里,我们需要确保我们拥有通过命令行参数传递的正确类型的对象:
第3行,我们检查以确保conf超过置信度阈值 ,并且该对象实际上是我们正在寻找的类的类型。当我们稍后运行脚本时,我们将使用“person”或“cat”作为示例,以便你可以看到我们如何过滤结果。
我们在第6行和第7行确定对象的边界框坐标(box) 。
然后我们建立我们的dlib目标跟踪器并提供边界框坐标(第14-16行)。这样,未来的跟踪更新将很容易。
在第17-20行 ,在帧上绘制边界框矩形和对象类的标签文本 。
让我们来处理已经建立tracker的情况 :
这个else块处理我们已经锁定一个对象来跟踪的情况。
就像电影《壮志凌云》里的混战。一旦敌方飞机被“guidance system”锁定,就可以更新跟踪。
这需要我们采取两项主要行动:
让我们完成循环:
如果帧需要写入视频(第2和3行)。我们将在屏幕上显示帧(第6行)。
如果在回放和跟踪期间的任何点按下退出键(“q”),我们将跳出循环(第7-11行)。
我们的fps估计器在14行更新 。
最后,让我们在脚本退出之前执行打印FPS吞吐量统计并释放指针:
我们脚本的内务处理包括:
要查看我们的dlib目标跟踪器的运行情况,请确保使用文章的源代码(下方链接中下载)。
然后,打开一个终端并执行以下命令:
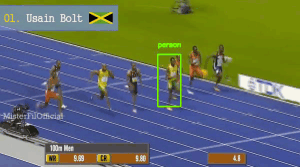
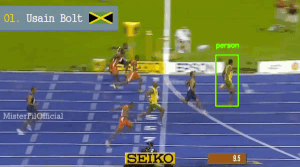
尤塞恩·博尔特(Usain Bolt,奥林匹克世界纪录保持者)最初在视频开头时就以高置信度发现。接着,他在100米比赛中被成功追踪。
下面我们有第二个使用dlib进行目标跟踪的示例:
猫主人试图带他们的猫散步的视频片段(这猫真可怜。。)。
如果你观看了完整输出视频,可能会注意到目标跟踪器在演示快结束时表现得很奇怪(就像上面这个GIF演示的一样)。
那么,这里发生了什么?为什么跟踪器会跟丢?
请记住,没有完美的目标跟踪器 - 并且,这种目标跟踪算法还不要求你在输入图像的每一帧上运行更消耗算力的对象检测器。
相反,dlib的关联跟踪器结合了(1)关于前一帧中对象边界框位置的先验信息:(2)从当前帧获得的数据以推断对象的新位置。
一定会有算法丢失对象的时候。
为了解决这种情况,我建议偶尔运行更费算力的对象探测器,以验证物体是否仍在那里,(2)用更新的(理想情况下是正确的)边界框坐标重新播种目标跟踪。
推荐:https://www.pyimagesearch.com/2018/08/13/opencv-people-counter/
毫无疑问,我知道会有人希望将此方法应用于多目标跟踪而不是单个目标跟踪。是否可以使用dlib的关联跟踪器跟踪多个对象?
答案是肯定的!
我将在后续讨论多目标跟踪,敬请期待。
在本文中,我们讨论了dlib的目标跟踪算法。与质心跟踪不同,dlib的目标跟踪算法可以利用从输入RGB图像获得的信息更新自身,即算法不需要为输入视频流中的每个帧计算一组边界框。
我们发现,dlib的关联跟踪算法很稳定,能够实时运行。
然而,最大的缺点是:如果视角发生了很大的变化,或者被跟踪的对象被遮挡关联跟踪器可能变得“混乱”,并丢失我们希望跟踪的对象。这种情况下,我们可以重新运行我们的(耗算力大)对象检测器来重新确定我们跟踪对象的位置。
下载源码:www.pyimagesearch.com/2018/10/22/object-tracking-with-dlib/
过去,我们曾经讨论过质心跟踪(centroid tracking),这是一种简单而有效的方法,它可以(1)为图像中的每个目标(或者说对象)分配唯一的ID,然后(2)跟踪视频流中移动的每个对象和其关联的ID。
这种跟踪算法的最大缺点是,在大多数情况下,必须在每个输入帧上运行单独的对象检测器,这种行为作为对象检测器来说很不友善,运行起来计算成本很高(包括HOG +线性SVM,Faster R-CNNs和SSD)。
另一种方法是:
- 执行一次对象检测(或每N帧执行一次)
- 然后应用专门的跟踪算法,算法可以在后续帧中移动时跟踪目标,且无需执行对象检测
那么,这种方法可行吗?
答案是肯定的,特别是我们可以使用dlib的关联跟踪算法实现。在今天博文的剩余部分中,你将学习如何应用dlib的关联跟踪器在视频流中实时跟踪对象。
使用dlib进行目标跟踪
我们将从今天的教程开始,简要讨论dlib基于关联的目标跟踪的实现。
然后,我将向你展示如何在自己的应用程序中使用dlib的目标跟踪器。
最后,我们将讨论dlib的目标跟踪器的一些缺点和局限性。
什么是关联跟踪器?
DLIB关联跟踪器(correlation tracker)Danelljan等人的2014年论文《Accurate Scale Estimation for Robust Visual Tracking》实现。
论文:http://www.bmva.org/bmvc/2014/papers/paper038/index.html
同时,他们的工作建立在Bolme等人2010年的工作《Visual Object Tracking using Adaptive Correlation Filters》的基础上。虽然MOSSE跟踪器适用于平移,但应用于尺寸发生变化的物品上通常会失败。
论文:http://www.cs.colostate.edu/~vision/publications/bolme_cvpr10.pdf
Danelljan等人的工作。提出利用“scale pyramid”在找到最佳平移后准确估计物体的比例。这一突破使我们能够跟踪在平移和在整个视频流中进行缩放的对象 。此外,我们可以实时执行这个跟踪。
有关算法的详细介绍,请参阅上面论文链接。
项目结构
要查看这个项目是如何组织的,只需在终端中使用tree命令:
$ tree

.

├── input

│   ├── cat.mp4

│   └── race.mp4

├── output

│   ├── cat_output.avi

│   └── race_output.avi

├── mobilenet_ssd

│   ├── MobileNetSSD_deploy.caffemodel

│   └── MobileNetSSD_deploy.prototxt

└── track_object.py


3 directories, 7 files
我们有三个目录:
- input / :包含用于目标跟踪的输入视频。
- output/ :我们处理过的视频。在处理过的视频中,被跟踪的物体使用框和标签进行注释。
- mobilenet_ssd / :Caffe CNN模型文件包含在此目录中。
今天我们将回顾一个Python脚本: track_object .py 。
实现我们的dlib目标跟踪器
让我们继续使用dlib实现我们的目标跟踪器。
打开 track_object .py 并插入以下代码:
# import the necessary packages

from imutils.video import FPS

import numpy as np

import argparse

import imutils

import dlib

import cv2
在这里我们导入我们所需的包如dlib、imutils和OpenCV。
接下来,让我们解析一下命令行参数
# construct the argument parse and parse the arguments

ap = argparse.ArgumentParser()

ap.add_argument("-p", "--prototxt", required=True,

	help="path to Caffe 'deploy' prototxt file")

ap.add_argument("-m", "--model", required=True,

	help="path to Caffe pre-trained model")

ap.add_argument("-v", "--video", required=True,

	help="path to input video file")

ap.add_argument("-l", "--label", required=True,

	help="class label we are interested in detecting + tracking")

ap.add_argument("-o", "--output", type=str,

	help="path to optional output video file")

ap.add_argument("-c", "--confidence", type=float, default=0.2,

	help="minimum probability to filter weak detections")

args = vars(ap.parse_args())
我们的脚本有四个必需的命令行参数:
- - prototxt :Caffe部署原型文件的路径。
- - model :Caffe预训练模型的路径。
- - video :输入视频文件的路径。本文的脚本适用于视频文件而不是网络摄像头(但很容易改为支持摄像头)。
- - label :我们有兴趣检测和跟踪的类标签。查看该模型支持的可用类的下一个代码块
还有两个可选的:
- - output :如果要保存目标跟踪器的结果,则为输出视频文件提供一个可选路径。
- - confidence : default = 0.2 ,这是最小概率阈值,它允许我们从Caffe对象检测器中过滤较弱的检测。
让我们定义这个模型支持的类,并从磁盘加载我们的网络:
# initialize the list of class labels MobileNet SSD was trained to

# detect

CLASSES = ["background", "aeroplane", "bicycle", "bird", "boat",

	"bottle", "bus", "car", "cat", "chair", "cow", "diningtable",

	"dog", "horse", "motorbike", "person", "pottedplant", "sheep",

	"sofa", "train", "tvmonitor"]


# load our serialized model from disk

print("[INFO] loading model...")

net = cv2.dnn.readNetFromCaffe(args["prototxt"], args["model"])
我们将使用经过预训练的MobileNet SSD在单个帧中执行对象检测。接着,对象的位置将被传递给dlib的关联跟踪器,以便在视频的剩余帧中进行跟踪。
模型支持20个对象类(有一个背景类,第3-6行)。
注意: 如果使用的是其他Caffe模型,则需要重新定义CLASSES 列表。同样,如果使用本中包含的模型,请不要修改此列表。
在循环视频帧之前,我们需要将模型加载到内存中。这在第10行处理, 其中加载Caffe模型所需的prototxt和model文件的路径(两者都在我们的命令行args字典中提供)。
现在让我们执行重要的初始化,特别是我们的视频流:
# initialize the video stream, dlib correlation tracker, output video

# writer, and predicted class label

print("[INFO] starting video stream...")

vs = cv2.VideoCapture(args["video"])

tracker = None

writer = None

label = ""


# start the frames per second throughput estimator

fps = FPS().start()
我们的视频流, tracker和视频写入器(writer)对象在第4-6行初始化 。我们还在第7行初始化了文本标签label。
我们的每秒帧数估算器在第10行实例化 。
现在我们已准备好开始循环我们的视频帧:
# loop over frames from the video file stream

while True:

	# grab the next frame from the video file

	(grabbed, frame) = vs.read()


	# check to see if we have reached the end of the video file

	if frame is None:

		break


	# resize the frame for faster processing and then convert the

	# frame from BGR to RGB ordering (dlib needs RGB ordering)

	frame = imutils.resize(frame, width=600)

	rgb = cv2.cvtColor(frame, cv2.COLOR_BGR2RGB)


	# if we are supposed to be writing a video to disk, initialize

	# the writer

	if args["output"] is not None and writer is None:

		fourcc = cv2.VideoWriter_fourcc(*"MJPG")

		writer = cv2.VideoWriter(args["output"], fourcc, 30,

			(frame.shape[1], frame.shape[0]), True)
我们在第2行开始while循环, 然后继续在第4行抓取一个frame。
我们的帧被调整大小,并交换颜色通道(第12和13行)。调整大小可以加快处理速度,你可以尝试使用帧尺寸(frame dimension)来获得更高的每秒帧数(FPS)。dlib需要转换为RGB色彩空间(OpenCV默认BGR)。
在运行时,可以通过命令行参数传递输出视频路径(视情况选择)。所以,如果有必要,我们将初始化我们的视频写入器 上 线17-20。有关使用OpenCV将视频写入磁盘的更多信息,请参阅:https://www.pyimagesearch.com/2016/02/22/writing-to-video-with-opencv/
接下来,我们需要检测一个跟踪对象(如果我们还没有):
	# if our correlation object tracker is None we first need to

	# apply an object detector to seed the tracker with something

	# to actually track

	if tracker is None:

		# grab the frame dimensions and convert the frame to a blob

		(h, w) = frame.shape[:2]

		blob = cv2.dnn.blobFromImage(frame, 0.007843, (w, h), 127.5)


		# pass the blob through the network and obtain the detections

		# and predictions

		net.setInput(blob)

		detections = net.forward()
如果我们的tracker对象为 None (第4行),我们首先需要检测输入帧中的对象 。为此,我们创建一个 blob (第7行)并通过网络传递它(第11和12行)。
我们 现在处理detections:
		# ensure at least one detection is made

		if len(detections) > 0:

			# find the index of the detection with the largest

			# probability -- out of convenience we are only going

			# to track the first object we find with the largest

			# probability; future examples will demonstrate how to

			# detect and extract *specific* objects

			i = np.argmax(detections[0, 0, :, 2])


			# grab the probability associated with the object along

			# with its class label

			conf = detections[0, 0, i, 2]

			label = CLASSES[int(detections[0, 0, i, 1])]
如果我们的物体探测器找到了若干对象(第2行),我们会抓取概率最大的对象(第8行)。
本文演示了如何使用dlib来执行单个目标跟踪,因此我们需要找到概率最高的检测对象(以后的博客文章将介绍使用dlib进行多目标跟踪)。
从那里,我们将获得了与对象相关的置信度(conf )和label(第12和13行)。
现在是时候过滤掉检测结果了。这里,我们需要确保我们拥有通过命令行参数传递的正确类型的对象:
			# filter out weak detections by requiring a minimum

			# confidence

			if conf > args["confidence"] and label == args["label"]:

				# compute the (x, y)-coordinates of the bounding box

				# for the object

				box = detections[0, 0, i, 3:7] * np.array([w, h, w, h])

				(startX, startY, endX, endY) = box.astype("int")


				# construct a dlib rectangle object from the bounding

				# box coordinates and then start the dlib correlation

				# tracker

				tracker = dlib.correlation_tracker()

				rect = dlib.rectangle(startX, startY, endX, endY)

				tracker.start_track(rgb, rect)


				# draw the bounding box and text for the object

				cv2.rectangle(frame, (startX, startY), (endX, endY),

					(0, 255, 0), 2)

				cv2.putText(frame, label, (startX, startY - 15),

					cv2.FONT_HERSHEY_SIMPLEX, 0.45, (0, 255, 0), 2)
第3行,我们检查以确保conf超过置信度阈值 ,并且该对象实际上是我们正在寻找的类的类型。当我们稍后运行脚本时,我们将使用“person”或“cat”作为示例,以便你可以看到我们如何过滤结果。
我们在第6行和第7行确定对象的边界框坐标(box) 。
然后我们建立我们的dlib目标跟踪器并提供边界框坐标(第14-16行)。这样,未来的跟踪更新将很容易。
在第17-20行 ,在帧上绘制边界框矩形和对象类的标签文本 。
让我们来处理已经建立tracker的情况 :
	# otherwise, we've already performed detection so let's track

	# the object

	else:

		# update the tracker and grab the position of the tracked

		# object

		tracker.update(rgb)

		pos = tracker.get_position()


		# unpack the position object

		startX = int(pos.left())

		startY = int(pos.top())

		endX = int(pos.right())

		endY = int(pos.bottom())


		# draw the bounding box from the correlation object tracker

		cv2.rectangle(frame, (startX, startY), (endX, endY),

			(0, 255, 0), 2)

		cv2.putText(frame, label, (startX, startY - 15),

			cv2.FONT_HERSHEY_SIMPLEX, 0.45, (0, 255, 0), 2)
这个else块处理我们已经锁定一个对象来跟踪的情况。
就像电影《壮志凌云》里的混战。一旦敌方飞机被“guidance system”锁定,就可以更新跟踪。
这需要我们采取两项主要行动:
- 更新我们的跟踪器对象(第6行) - 比较繁杂的任务由后端的update方法完成。
- 从跟踪器中获取对象的位置(get_position)(第7行)。假设一个机器人跟踪被跟踪的物体,PID控制回路将派上用场。在我们的例子中,我们只是在第16-19行的边界框和标签上注释帧中的对象 。
让我们完成循环:
	# check to see if we should write the frame to disk

	if writer is not None:

		writer.write(frame)


	# show the output frame

	cv2.imshow("Frame", frame)

	key = cv2.waitKey(1) & 0xFF


	# if the `q` key was pressed, break from the loop

	if key == ord("q"):

		break


	# update the FPS counter

	fps.update()
如果帧需要写入视频(第2和3行)。我们将在屏幕上显示帧(第6行)。
如果在回放和跟踪期间的任何点按下退出键(“q”),我们将跳出循环(第7-11行)。
我们的fps估计器在14行更新 。
最后,让我们在脚本退出之前执行打印FPS吞吐量统计并释放指针:
# stop the timer and display FPS information

fps.stop()

print("[INFO] elapsed time: {:.2f}".format(fps.elapsed()))

print("[INFO] approx. FPS: {:.2f}".format(fps.fps()))


# check to see if we need to release the video writer pointer

if writer is not None:

	writer.release()


# do a bit of cleanup

cv2.destroyAllWindows()

vs.release()
我们脚本的内务处理包括:
- fps计数器停止,FPS信息显示在终端中(第2-4行)。
- 然后,如果我们编辑输出视频,我们释放视频写入器(第7和8行)。
- 最后,我们关闭所有OpenCV窗口并发布视频流(第11和12行)。
实时运行dlib的目标跟踪器
要查看我们的dlib目标跟踪器的运行情况,请确保使用文章的源代码(下方链接中下载)。
然后,打开一个终端并执行以下命令:
$ python track_object.py --prototxt mobilenet_ssd/MobileNetSSD_deploy.prototxt \

	--model mobilenet_ssd/MobileNetSSD_deploy.caffemodel --video input/race.mp4 \

	--label person --output output/race_output.avi

[INFO] loading model...

[INFO] starting video stream...

[INFO] elapsed time: 13.18

[INFO] approx. FPS: 25.80
尤塞恩·博尔特(Usain Bolt,奥林匹克世界纪录保持者)最初在视频开头时就以高置信度发现。接着,他在100米比赛中被成功追踪。
下面我们有第二个使用dlib进行目标跟踪的示例:
$ python track_object.py --prototxt mobilenet_ssd/MobileNetSSD_deploy.prototxt \

	--model mobilenet_ssd/MobileNetSSD_deploy.caffemodel --video input/cat.mp4 \

	--label cat --output output/cat_output.avi

[INFO] loading model...

[INFO] starting video stream...

[INFO] elapsed time: 6.76

[INFO] approx. FPS: 24.12
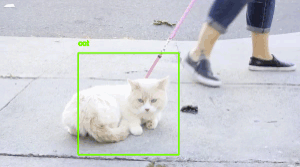
猫主人试图带他们的猫散步的视频片段(这猫真可怜。。)。
缺点和可能的改进
如果你观看了完整输出视频,可能会注意到目标跟踪器在演示快结束时表现得很奇怪(就像上面这个GIF演示的一样)。
那么,这里发生了什么?为什么跟踪器会跟丢?
请记住,没有完美的目标跟踪器 - 并且,这种目标跟踪算法还不要求你在输入图像的每一帧上运行更消耗算力的对象检测器。
相反,dlib的关联跟踪器结合了(1)关于前一帧中对象边界框位置的先验信息:(2)从当前帧获得的数据以推断对象的新位置。
一定会有算法丢失对象的时候。
为了解决这种情况,我建议偶尔运行更费算力的对象探测器,以验证物体是否仍在那里,(2)用更新的(理想情况下是正确的)边界框坐标重新播种目标跟踪。
推荐:https://www.pyimagesearch.com/2018/08/13/opencv-people-counter/
那么多目标跟踪呢?
毫无疑问,我知道会有人希望将此方法应用于多目标跟踪而不是单个目标跟踪。是否可以使用dlib的关联跟踪器跟踪多个对象?
答案是肯定的!
我将在后续讨论多目标跟踪,敬请期待。
总结
在本文中,我们讨论了dlib的目标跟踪算法。与质心跟踪不同,dlib的目标跟踪算法可以利用从输入RGB图像获得的信息更新自身,即算法不需要为输入视频流中的每个帧计算一组边界框。
我们发现,dlib的关联跟踪算法很稳定,能够实时运行。
然而,最大的缺点是:如果视角发生了很大的变化,或者被跟踪的对象被遮挡关联跟踪器可能变得“混乱”,并丢失我们希望跟踪的对象。这种情况下,我们可以重新运行我们的(耗算力大)对象检测器来重新确定我们跟踪对象的位置。
下载源码:www.pyimagesearch.com/2018/10/22/object-tracking-with-dlib/

欢迎关注ATYUN官方公众号
商务合作及内容投稿请联系邮箱:bd@atyun.com


广告


写评论取消
回复取消