


请先登录您的atyun账户,方可使用该功能

审核通过后即可使用此功能,请耐心等待~


C-SATS工程副总裁教你如何用TensorFlow分类图像 part2
2017年12月24日 由 yuxiangyu 发表
345010
0
我们都知道,适当的训练对于将来有效的分类来说至关重要,为了训练工作,我们需要大量准确标记的数据。在第一部分中,我通过下载3000个预先标记的图像跳过了这个挑战。然后我向你展示了在TensorFlow中如何使用带标签的数据训练分类器。在这一部分,我们将使用新的数据集进行训练,并且我将介绍数据可视化工具TensorBoard,以便更好地理解,调试和优化我们的TensorFlow代码。
第一部分:C-SATS工程副总裁教你如何用TensorFlow分类图像 part1
鉴于我在医疗技术公司C-SATS担任工程副总裁的工作,我希望建立一个与手术有关的分类器。缝合似乎会很不错。它立即投入使用,并且我知道如何识别它。如果机器能够看到缝合正在发生,它可以自动识别缝合手术过程的步骤(或阶段),例如吻合术。并且,因为外科缝线的针和线比较独特,甚至外行也能辨认出来。
我的目标是训练一台识别医学视频中缝合的机器。
我可以访问数十亿帧的手术视频,其中许多包含缝合。但是这样还会面临标记的问题。幸运的是,C-SATS拥有一批经验丰富的注释师,他们是做这件事的专家。我的源数据是JSON中的视频文件和注释。
注释样本如下:
我写了一个Python脚本来使用JSON注释来决定从视频文件中抓取哪些帧。
现在我们像上次教你如何用TensorFlow分类图像那样,再次对这些模型进行再训练。
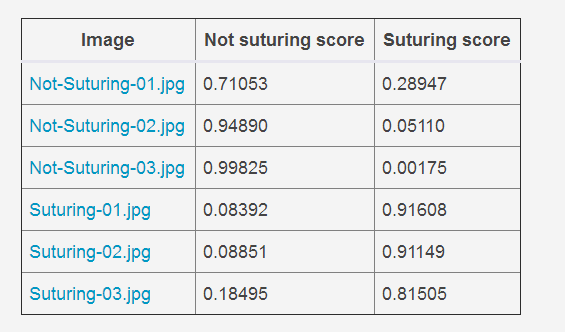
使用这个脚本来剪出10k帧用了大约10分钟,然后花费一个小时左右,进行再训练识别缝合达到90%的准确性。我使用了训练集之外的新数据进行了抽查,我试过的每一帧都被正确识别(平均置信度分数为88%,中位数置信度分数为91%)。
下面是我的抽查结果。
深度学习与任何其他类型的软件一样,很难可视化内部的原理和交互。幸好我们可以使用TensorBoard。
C-SATS工程副总裁教你如何用TensorFlow分类图像 part1中的Retrain.py自动生成文件TensorBoard以用于生成表示再训练期间发生了什么的图。
要安装TensorBoard,运行
如果看到下面的输出,就使用浏览器浏览器打开下方网址。
你会看到这样的东西:
[video width="446" height="360" mp4="https://www.atyun.com/uploadfile/2017/12/short-TensorBoard-screencast-1.mp4"][/video]
我希望这个能够帮到你。在再训练时,我发现在“SCALARS”选项下可以看到,当我们执行更多的训练步骤时或交叉熵减少时准确性如何提高。这就是是我们想要了解的。
第一部分:C-SATS工程副总裁教你如何用TensorFlow分类图像 part1
鉴于我在医疗技术公司C-SATS担任工程副总裁的工作,我希望建立一个与手术有关的分类器。缝合似乎会很不错。它立即投入使用,并且我知道如何识别它。如果机器能够看到缝合正在发生,它可以自动识别缝合手术过程的步骤(或阶段),例如吻合术。并且,因为外科缝线的针和线比较独特,甚至外行也能辨认出来。
我的目标是训练一台识别医学视频中缝合的机器。
我可以访问数十亿帧的手术视频,其中许多包含缝合。但是这样还会面临标记的问题。幸运的是,C-SATS拥有一批经验丰富的注释师,他们是做这件事的专家。我的源数据是JSON中的视频文件和注释。
注释样本如下:
[

    {

        "annotations": [

            {

                "endSeconds": 2115.215,

                "label": "suturing",

                "startSeconds": 2319.541

            },

            {

                "endSeconds": 2976.301,

                "label": "suturing",

                "startSeconds": 2528.884

            }

        ],

        "durationSeconds": 2975,

        "videoId": 5

    },

    {

        "annotations": [

        // ...etc...
我写了一个Python脚本来使用JSON注释来决定从视频文件中抓取哪些帧。
ffmpeg做实际的抓取。我决定每秒最多抓取一帧,然后我将视频秒的总数除以四,得到10k秒(10k帧)。在找出要抓取的秒数之后,我进行了一个快速测试,看看缝合注释内是否有特定的秒(isWithinSuturingSegment())。下面是grab.py的代码:#!/usr/bin/python
# Grab frames from videos with ffmpeg. Use multiple cores.
# Minimum resolution is 1 second--this is a shortcut to get less frames.
# (C)2017 Adam Monsen. License: AGPL v3 or later.
import json
import subprocess
from multiprocessing import Pool
import os
frameList = []
def isWithinSuturingSegment(annotations, timepointSeconds):
for annotation in annotations:
startSeconds = annotation['startSeconds']
endSeconds = annotation['endSeconds']
if timepointSeconds > startSeconds and timepointSeconds < endSeconds:
return True
return False
with open('available-suturing-segments.json') as f:
j = json.load(f)
for video in j:
videoId = video['videoId']
videoDuration = video['durationSeconds']
# generate many ffmpeg frame-grabbing commands
start = 1
stop = videoDuration
step = 4 # Reduce to grab more frames
for timepointSeconds in xrange(start, stop, step):
inputFilename = '/home/adam/Downloads/suturing-videos/{}.mp4'.format(videoId)
outputFilename = '{}-{}.jpg'.format(video['videoId'], timepointSeconds)
if isWithinSuturingSegment(video['annotations'], timepointSeconds):
outputFilename = 'suturing/{}'.format(outputFilename)
else:
outputFilename = 'not-suturing/{}'.format(outputFilename)
outputFilename = '/home/adam/local/{}'.format(outputFilename)
commandString = 'ffmpeg -loglevel quiet -ss {} -i {} -frames:v 1 {}'.format(
timepointSeconds, inputFilename, outputFilename)
frameList.append({
'outputFilename': outputFilename,
'commandString': commandString,
})
def grabFrame(f):
if os.path.isfile(f['outputFilename']):
print 'already completed {}'.format(f['outputFilename'])
else:
print 'processing {}'.format(f['outputFilename'])
subprocess.check_call(f['commandString'].split())
p = Pool(4) # for my 4-core laptop
p.map(grabFrame, frameList)
现在我们像上次教你如何用TensorFlow分类图像那样,再次对这些模型进行再训练。
使用这个脚本来剪出10k帧用了大约10分钟,然后花费一个小时左右,进行再训练识别缝合达到90%的准确性。我使用了训练集之外的新数据进行了抽查,我试过的每一帧都被正确识别(平均置信度分数为88%,中位数置信度分数为91%)。
下面是我的抽查结果。
因图片血腥无法上传可访问网址查看(https://opensource.com/article/17/12/how-to-tensorboard)
如何使用TensorBoard
深度学习与任何其他类型的软件一样,很难可视化内部的原理和交互。幸好我们可以使用TensorBoard。
C-SATS工程副总裁教你如何用TensorFlow分类图像 part1中的Retrain.py自动生成文件TensorBoard以用于生成表示再训练期间发生了什么的图。
要安装TensorBoard,运行
retrain.py后在容器中运行下面代码。pip install tensorboard
tensorboard --logdir /tmp/retrain_logs
如果看到下面的输出,就使用浏览器浏览器打开下方网址。
Starting TensorBoard 41 on port 6006

(You can navigate to http://172.17.0.2:6006)
你会看到这样的东西:
[video width="446" height="360" mp4="https://www.atyun.com/uploadfile/2017/12/short-TensorBoard-screencast-1.mp4"][/video]
我希望这个能够帮到你。在再训练时,我发现在“SCALARS”选项下可以看到,当我们执行更多的训练步骤时或交叉熵减少时准确性如何提高。这就是是我们想要了解的。

欢迎关注ATYUN官方公众号
商务合作及内容投稿请联系邮箱:bd@atyun.com


广告


写评论取消
回复取消