


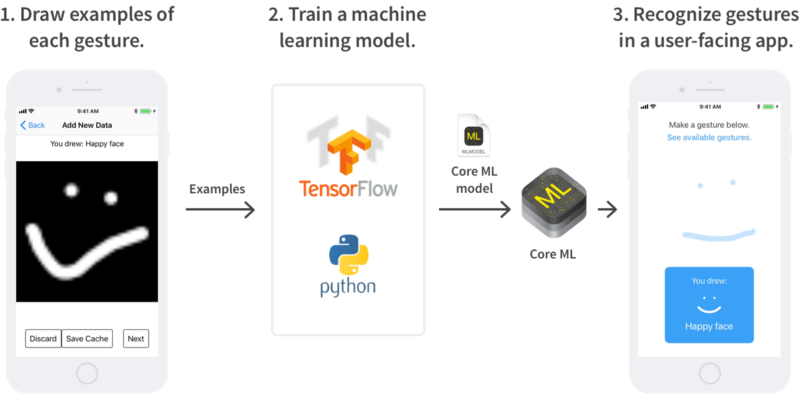
- 一个APP收集每个手势的一些例子(画一些复选标记或者心形,等等)。
- 一些Python脚本用于训练机器学习算法(下面将会解释),以识别手势。我们将使用TensorFlow,稍后会讲到。
- 这款APP可以使用自定义手势。记录用户在屏幕上的动作,并使用机器学习算法来找出它们所代表的手势。


请先登录您的atyun账户,方可使用该功能
审核通过后即可使用此功能,请耐心等待~


深度: 在iOS11中使用Core ML 和TensorFlow对手势进行智能识别
2017年09月27日 由 yining 发表
174517
0
在计算机科学中,手势识别是通过数学算法来识别人类手势的一个议题。用户可以使用简单的手势来控制或与设备交互,让计算机理解人类的行为。
这篇文章将带领你实现在你自己的应用中使用深度学习来识别复杂的手势,比如心形、复选标记或移动设备上的笑脸。我还将介绍和使用苹果的Core ML框架(iOS11中的新框架)。
在屏幕上随便划动两下,手机就会对复杂的手势进行实时识别
这项技术使用机器学习来识别手势。本文中的一些内容是特定于iOS系统的,但是Android开发者仍然可以找到一些有用的信息。
完成项目的源代码:https://github.com/mitochrome/complex-gestures-demo
我们将构建什么?
在本教程结束时,我们将有一个设置,让我们可以选择完全自定义的手势,并在iOS应用中非常准确地识别它们。
我们所画的手势将用于训练机器学习算法,我们将用Core ML来评估应用内(in-app)的算法
什么是机器学习算法?
机器学习算法从一组数据中学习,以便根据其他数据的不完整的信息作出推断。
在我们的例子中,数据是用户及其相关的手势类(“心形”、“复选标记”等)在屏幕上做出的划动。我们想要推断的是,在我们不知道手势类(不完整的信息)的情况下,用户所画出的东西是什么。
允许一种算法从数据中学习,称为“训练”。对数据进行建模的推理机器被恰当地称为“模型”。
什么是Core ML?
机器学习模型可能是复杂的,(尤其是在移动设备上)评估是非常缓慢的。在iOS 11中,苹果引入了Core ML,这是一种新的框架,使其快速并易于实现。对于Core ML,实现一个模型主要是为了在Core ML模型格式(.mlmodel)中保存它。
Core ML的详细介绍,请参阅:https://developer.apple.com/documentation/coreml
使用官方的Python包coremltools,可以方便地保存mlmodel文件。它有针对Caffe、Keras、LIBSVM、scikit-learn和XCBoost模型的转换器,以及当那些还没有足够能力(例如使用TensorFlow时)的低级别API。但要注意的是,coremltools目前需要Python的2.7版本。coremltools地址:https://pypi.python.org/pypi/coremltools
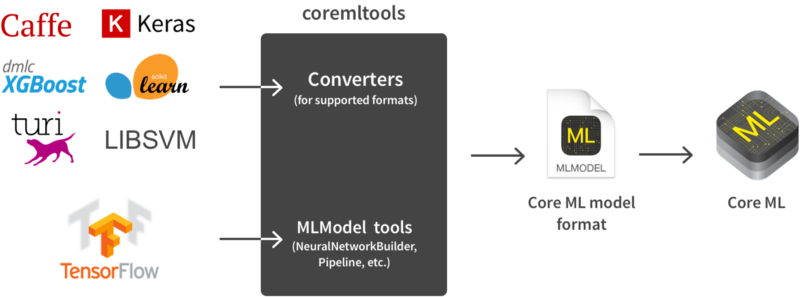
支持的格式可以通过使用coremltools自动转换成Core ML模型。像TensorFlow这样的不支持格式需要更多的手动操作来完成。
注意:Core ML只支持在设备上评估模型,而不是训练新模型。
1.生成数据集
首先,让我们确保我们的机器学习算法有一些数据(手势)来学习。为了生成一个真实的数据集,我编写了一个名为“GestureInput”的iOS应用,用于在设备上输入手势。它允许你输入大量的笔画,然后预览所生成的图像,并将其添加到数据集中。你还可以修改相关的类(称为标签)并且删除示例。
当我想要改变它们显示的频率时(例如,当向现有的数据集添加一个新的类时),我将更改硬编码的值并重新编译。尽管看起来不是很漂亮,但很管用。
硬编码的值:
为机器学习算法生成数据
项目的自述文件解释了如何修改手势类的集合,包括复选标记、x标记、“涂鸦”(在上下移动时快速的侧向运动)、圆形、U形、心形、加号、问号、大写A、大写B、笑脸和悲伤的表情。还包括一个样本数据集,你可以将它传输到你的设备上。
样本数据集:
输出训练
GestureInput中的“Rasterize”按钮将用户画的图案转换为图像,并将其保存到一个名为data.trainingset的文件中。这些图像就是我们要输入的算法。
缩放并翻译用户的手势(“绘画”)来适应一个固定大小的方框,然后将其转换为灰度图像。这有助于让我们的手势独立地识别用户的手势位置和大小。它还最小化了代表空白空间的图像像素的数量。参考:https://hackernoon.com/a-new-approach-to-touch-based-mobile-interaction-ba47b14400b0
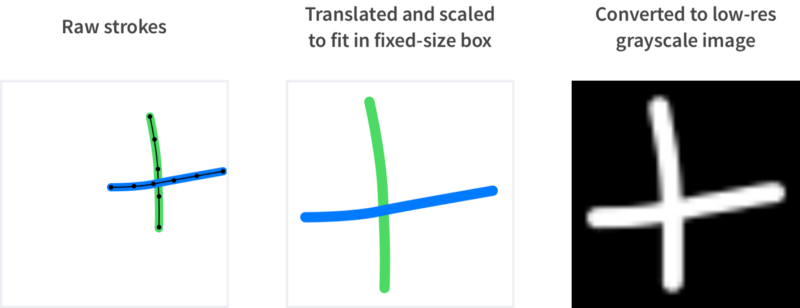
将用户画出的图案转换成一个灰度图像来输入我们的机器学习算法
请注意,我仍然在另一个文件中存储每次笔画的触摸位置的原始时间序列。这样,我就可以改变手势在未来转换成图像的方式,甚至可以使用非基于图像的方法来识别,而不用再画出所有的手势。手势输入在它的container文档文件夹中保存数据集。从你的设备上获取数据的最简单方法是通过Xcode下载container。
2. 训练一个神经网络
目前,最先进的图像分类机器学习算法是卷积神经网络(CNNs)。我们将用TensorFlow训练一个CNNs,并在我们的APP中使用它。
我的神经网络是基于“Deep MNIST for Experts”的TensorFlow教程所使用的。教程地址:https://www.tensorflow.org/get_started/mnist/pros
我用来训练和导出模型的一组脚本在一个叫做“gesturelearner”的文件夹中。文件夹地址:https://github.com/mitochrome/complex-gestures-demo/tree/master/gesturelearner。
我将讨论典型的用例,但是它们有一些额外的以virtualenv开头的命令行选项可能是有用的:
cd /path/to/gesturelearner


# Until coremltools supports Python 3, use Python 2.7.


virtualenv -p $(which python2.7) venv


pip install -r requirements.txt
准备数据集
首先,我使用filter.py将数据集分成15%的“测试集”和85%的“训练集”。
# Activate the virtualenv.


source /path/to/gesturelearner/venv/bin/activate


# Split the data set.


python /path/to/gesturelearner/filter.py --test-fraction=0.15


data.trainingset
训练集当然是用来训练神经网络的。测试集的目的是为了说明神经网络的学习是如何对新数据进行归纳的。
我选择把15%的数据放在测试集中,如果你只有几百个手势例子,那么15%的数字将是一个相当小的数字。这意味着测试集的准确性只会让你对算法的表现有一个大致的了解。
训练
在把我的自定义.trainingset格式变为TensorFlow喜欢的TFRecords格式之后,我使用train.py来训练一个模型。我们给神经网络提供了有力的分类,它在未来会遇到新的手势。
train.py列印出它的进程,然后定期保存一个TensorFlow Checkpoint文件,并在测试集上测试它的准确性(如果指定的话)。
# Convert the generated files to the TensorFlow TFRecords format.


python /path/to/gesturelearner/convert_to_tfrecords.py


data_filtered.trainingset


python /path/to/gesturelearner/convert_to_tfrecords.py


data_filtered_test.trainingset


# Train the neural network.


python /path/to/gesturelearner/train.py --test-


file=data_filtered_test.tfrecords data_filtered.tfrecords
训练应该很快,在一分钟内达到98%的准确率,在大约10分钟后完成。
 训练神经网络
如果你在训练中退出了train.py,你可以稍后重新启动,它将加载checkpoint文件以获取它所处的位置,它还可以选择从哪里加载模型以及保存它的位置。
用不平衡数据训练
如果你的手势比其他手势有更多的例子,那么网络就会倾向于学会以牺牲其他手势为代价来识别更好的手势。有几种不同的方法来应对这个问题:
- 神经网络是通过最小化与制造错误相关的成本函数来训练的。为了避免忽略某些类,你可以增加错误分类的成本。
- 包含一些较少代表性(less-represented)的手势的副本,这样你的所有手势的数量都是相等的。
- 删除一些更有代表性(more-represented)的手势的例子。
我的代码并不是开箱即用的,但是它们应该相对容易实现。
输出到Core ML
Core ML没有一个用于将TensorFlow模型转换为Core ML的ML模型的“转换器”。这就给我们提供了两种把我们的神经网络转换成一个ML模型的方法:
使用一个用于构建神经网络的API的coremltools.模型包。模型包地址:https://pypi.python.org/pypi/coremltools API地址:https://apple.github.io/coremltools/generated/coremltools.models.neural_network.html
由于MLModel说明是基于Google的protocol buffers,所以你可以跳过coremltools,然后直接在任何编程语言中使用protobuf。Google的protocol buffers地址:https://developers.google.com/protocol-buffers/
到目前为止,除了在现有的转换器的内部代码之外,在web上似乎没有找到任何方法的例子。下面是我使用coremltools的示例的精简版:
1 from coremltools.models import MLModel

2 from coremltools.models.neural_network import NeuralNetworkBuilder

3 import coremltools.models.datatypes as datatypes

4


5 # ...

6


7 def make_mlmodel(variables):

8     # Specify the inputs and outputs (there can be multiple).

9     # Each name corresponds to the input_name/output_name of a layer in the network so

10     # that Core ML knows where to insert and extract data.

11     input_features = [('image', datatypes.Array(1, IMAGE_HEIGHT, IMAGE_WIDTH))]

12     output_features = [('labelValues', datatypes.Array(NUM_LABEL_INDEXES))]

13     builder = NeuralNetworkBuilder(input_features, output_features, mode=None)

14


15     # The "name" parameter has no effect on the function of the network. As far as I know

16     # it's only used when Xcode fails to load your mlmodel and gives you an error telling

17     # you what the problem is.

18     # The input_names and output_name are used to link layers to each other and to the

19     # inputs and outputs of the model. When adding or removing layers, or renaming their

20     # outputs, always make sure you correct the input and output names of the layers

21     # before and after them.

22     builder.add_elementwise(name='add_layer',

23                             input_names=['image'], output_name='add_layer', mode='ADD',

24                             alpha=-0.5)

25


26     # Although Core ML internally uses weight matrices of shape

27     # (outputChannels, inputChannels, height, width) (as can be found by looking at the

28     # protobuf specification comments), add_convolution takes the shape

29     # (height, width, inputChannels, outputChannels) (as can be found in the coremltools

30     # documentation). The latter shape matches what TensorFlow uses so we don't need to

31     # reorder the matrix axes ourselves.

32     builder.add_convolution(name='conv2d_1', kernel_channels=1,

33                             output_channels=32, height=3, width=3, stride_height=1,

34                             stride_width=1, border_mode='same', groups=0,

35                             W=variables['W_conv1'].eval(), b=variables['b_conv1'].eval(),

36                             has_bias=True, is_deconv=False, output_shape=None,

37                             input_name='add_layer', output_name='conv2d_1')

38


39     builder.add_activation(name='relu_1', non_linearity='RELU', input_name='conv2d_1',

40                            output_name='relu_1', params=None)

41


42     builder.add_pooling(name='maxpool_1', height=2, width=2, stride_height=2,

43                         stride_width=2, layer_type='MAX', padding_type='SAME',

44                         input_name='relu_1', output_name='maxpool_1')

45


46     # ...

47


48     builder.add_flatten(name='maxpool_3_flat', mode=1, input_name='maxpool_3',

49                         output_name='maxpool_3_flat')

50


51     # We must swap the axes of the weight matrix because add_inner_product takes the shape

52     # (outputChannels, inputChannels) whereas TensorFlow uses

53     # (inputChannels, outputChannels). Unlike with add_convolution (see the comment

54     # above), the shape add_inner_product expects matches what the protobuf specification

55     # requires for inner products.

56     builder.add_inner_product(name='fc1',

57                               W=tf_fc_weights_order_to_mlmodel(variables['W_fc1'].eval())

58                                 .flatten(),

59                               b=variables['b_fc1'].eval().flatten(),

60                               input_channels=6*6*64, output_channels=1024, has_bias=True,

61                               input_name='maxpool_3_flat', output_name='fc1')

62


63     # ...

64


65     builder.add_softmax(name='softmax', input_name='fc2', output_name='labelValues')

66


67     model = MLModel(builder.spec)

68


69     model.short_description = 'Model for recognizing a variety of images drawn on screen with one\'s finger'

70


71     model.input_description['image'] = 'A gesture image to classify'

72     model.output_description['labelValues'] = 'The "probability" of each label, in a dense array'

73


74     return model
使用它:
# Save a Core ML .mlmodel file from the TensorFlow checkpoint


model.ckpt.


python /path/to/gesturelearner/save_mlmodel.py model.ckpt
必须编写这种转换代码的一个副作用是,我们将整个网络描述为两个位置(TensorFlow代码位置和转换代码位置)。每当我们更改TensorFlow图时,我们就必须同步转换代码以确保我们的模型正确地导出。
希望将来苹果能开发出一种更好的输出TensorFlow模型的方法。而在Android上,你可以使用官方的Tensorflow API。
此外,谷歌还将发布一款名为TensorFlow Lite的移动优化版本的TensorFlow。
3.在应用内识别手势
最后,让我们把我们的模型放到一个面向用户的APP中,这个项目的一部分是手势识别(GestureRecognizer。项目地址:https://github.com/mitochrome/complex-gestures-demo/tree/ddaef7401cf3024c2df0a0af5883bbf2e7fac12a/apps
一旦你有了一个mlmodel文件,就可以将它添加到Xcode中的一个目标。你将需要运行Xcode 9。
Xcode 9将编译任何向目标添加的mlmodel文件,并为它们生成Swift类。我将我的模型命名为GestureModel,因此Xcode生成了
GestureModel, GestureModelInput和GestureModelOutput这三个类。我们需要将用户的手势转换成GestureModel接受的格式。这意味着要将这个手势转换成灰度图像,就像我们在步骤1中所做的那样。然后,Core ML要求我们将灰度值数组转换为多维数组类型,MLMultiArray。MLMultiArray:https://developer.apple.com/documentation/coreml/mlmultiarray
1 /**

2  * Convert the `Drawing` into a binary image of format suitable for input to the

3  * GestureModel neural network.

4  *

5  * - returns: If successful, a valid input for GestureModel

6  */

7 func drawingToGestureModelFormat(_ drawing: Drawing) -> MLMultiArray? {

8     guard let image = drawing.rasterized(), let grays = imageToGrayscaleValues(image: image) else {

9         return nil

10     }

11

12     guard let array = try? MLMultiArray(

13         shape: [

14             1,

15             NSNumber(integerLiteral: Int(image.size.width)),

16             NSNumber(integerLiteral: Int(image.size.height))

17         ],

18         dataType: .double

19         ) else {

20             return nil

21     }

22

23     let doubleArray = array.dataPointer.bindMemory(to: Float64.self, capacity: array.count)

24

25     for i in 0 ..< array.count {

26         doubleArray.advanced(by: i).pointee = Float64(grays[i]) / 255.0

27     }

28

29     return array

30 }
MLMultiArray就像一个围绕一个原始数组的包装器(wrapper),它告诉了Core ML它包含什么类型以及它的形状(例如维度)是什么。有了一个MLMultiArray,我们可以评估我们的神经网络。
1 /**

2  * Convert the `Drawing` into a grayscale image and use a neural network to compute

3  * values ("probabilities") for each gesture label.

4  *

5  * - returns: An array that has at each index `i` the value for

6  * `Touches_Label.all[i]`.

7  */

8 func predictLabel(drawing: Drawing) -> [Double]? {

9     // Convert the user's gesture ("drawing") into a fixed-size grayscale image.

10     guard let array = drawingToGestureModelFormat(drawing) else {

11         return nil

12     }

13

14     let model = GestureModel.shared

15

16     // The GestureModel convenience method prediction(image:) wraps our image in

17     // a GestureModelInput instance before passing that to prediction(input:).

18     // Both methods return a GestureModelOutput with our output in the

19     // labelValues property. The names "image" and "labelValues" come from the

20     // names we gave to the inputs and outputs of the .mlmodel when we saved it.

21     guard let labelValues = try? model.prediction(image: array).labelValues else {

22         return nil

23     }

24

25     // Convert the MLMultiArray labelValues into a normal array.

26     let dataPointer = labelValues.dataPointer.bindMemory(to: Double.self, capacity: labelValues.count)

27     return Array(UnsafeBufferPointer(start: dataPointer, count: labelValues.count))

28 }
我使用了一个GestureModel的共享实例,因为每个实例似乎都要花费很长的时间来分配。事实上,即使在创建实例之后,这个模型第一次评估的速度也很慢。当应用程序启动时,我用一个空白图像对网络进行评估,这样用户在开始做手势时不会看到延迟。
避免手势冲突
由于我使用的一些手势类彼此包含(笑脸与U形嘴相包含,x标记与上升的对角相包含),所以当用户想要绘制更复杂的图形时,可能会贸然地识别出更简单的手势。
为了减少冲突,我使用了两个简单的规则:
- 如果一个手势能构成更复杂的手势的一部分,那么就可以暂时延迟它的识别,看看用户是否能做出更大的手势。
考虑到用户的笔画数,一个还未被完全画出的手势(例如,一张笑脸需要至少画三笔:一张嘴巴和两只眼睛)是不能被识别的。
结语
就是这样!有了这个设置,你可以在大约20分钟内给你的iOS应用添加一个全新的手势(输入100张图片,训练达到99.5+%的准确率,并且把模型导出)。
要查看这些片段是如何组合在一起的,或者在你自己的项目中使用它们的话,请参阅完整的源代码:https://github.com/mitochrome/complex-gestures-demo

欢迎关注ATYUN官方公众号
商务合作及内容投稿请联系邮箱:bd@atyun.com
广告


广告
写评论取消
回复取消