


请先登录您的atyun账户,方可使用该功能

审核通过后即可使用此功能,请耐心等待~


使用OpenCV,Python和深度学习进行人脸识别
2018年07月03日 由 yuxiangyu 发表
485637
0
在这篇文章中,你将学会如何使用OpenCV、Python和深度学习在图像和视频流中执行人脸识别。我们今天将在这里使用的基于深度学习的面部嵌入,既高度准确又能够实时执行。
我们首先简要讨论基于深度学习的面部识别是如何工作的,包括“深度度量学习”的概念。
然后,我会教你安装执行人脸识别所需的库。
最后,我们将为静态图像和视频流实施人脸识别。
没错,我们的人脸识别实现能够实时运行。
那么,深度学习+人脸识别是如何工作的?
它的核心是一种称为深度度量学习(deep metric learning)的技术。
如果你有深度学习的经验,就会知道我们通常会训练一个网络来:
但是,深度度量学习不同。
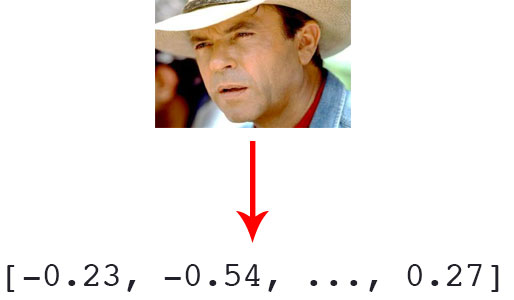
它并不试图输出单个标签(甚至不输出图像中的对象的坐标或边界框),而是输出一个实值特征向量。
对于dlib人脸识别网络,输出特征向量是用于量化人脸的128维(即,128个实值列表)。使用triplet来训练网络:
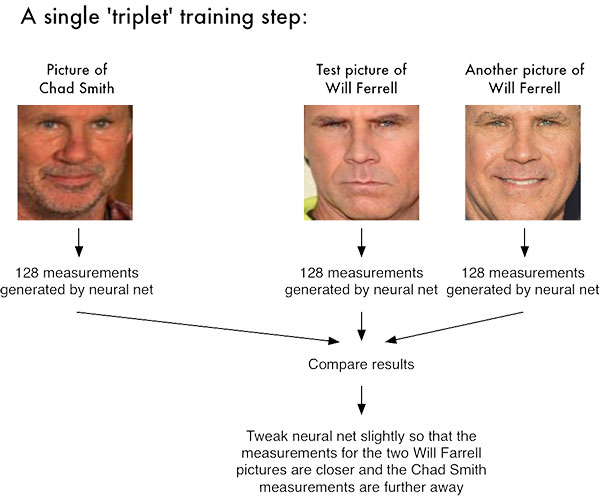
在这里,我们向网络提供三个图像:
以上图为例,我们提供了三个图像:一个Chad Smith和两个Will Ferrell。
我们的网络量化人脸,为每张人脸构建了128维嵌入(量化)。
然后,我们调整我们的神经网络的权重,以使两个Will Ferrell的128维的度量更接近,并远离Chad Smith。
我们用于人脸识别的网络架构基于下方论文的ResNet-34 ,但层数较少,滤波器数量减少一半。
论文:https://arxiv.org/abs/1512.03385
网络本身是由Davis King在大约300万张图像的数据集上进行训练的。在LFW数据集中,网络与其他最先进的方法进行比较,有高达99.38%的准确性。
为了使用Python和OpenCV进行脸部识别,我们需要安装两个额外的库:
由Davis King维护的dlib库包含我们实现的“深度度量学习”,用于构建用于实际识别过程的人脸嵌入。
而face_recognition库由Adam Geitgey创建,围绕dilb的人脸识别功能,使其更易于使用。
在这里,我假设你的系统上安装了OpenCV。如果没有,请按下方链接教程安装。
链接:https://www.pyimagesearch.com/opencv-tutorials-resources-guides/
然后,我们安装dlib和face_recognition包。
注意: 对于以下安装,如果你使用的是虚拟环境,请确保处于Python虚拟环境中。我强烈建议虚拟环境隔离你的项目。如果你已经遵循了我的OpenCV安装指南(并安装了 virtualenv + virtualenvwrapper ),那么你可以在安装dlib和ace_recognition之前使用workon命令 。
安装不支持GPU的dlib:
如果没有GPU,则可以使用pip 安装 dlib:
或者你可以从源代码编译:
安装支持GPU的dlib(可选)
如果你这样做有一个兼容CUDA的GPU可以安装 DLIB 与GPU的支持,使得面部识别速度更快,效率更高。
为此,我建议从源代码安装 dlib,因为你可以对构建有更多的控制:
安装face_recognition包
face_recognition模块通过一个简单的PIP命令安装:
安装 imutils
你还需要imutils。可以通过pip将其安装在你的Python虚拟环境中:
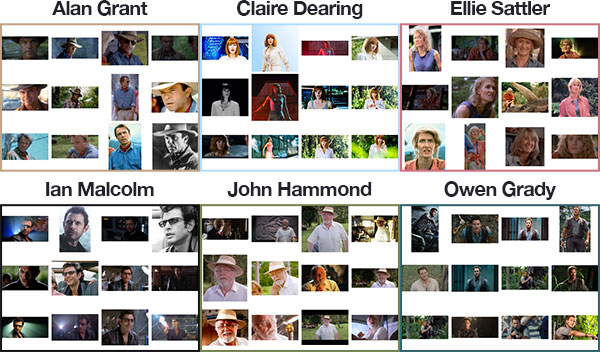
由于侏罗纪公园 (1993)是我最喜欢的电影,我们将对电影中的人物样本进行面部识别。这个数据集是在构建自定义人脸识别数据集的三种训练方法教程中构建的。 使用这个数据集的图像,我们会:
通过检查tree命令的输出可以看到我们的项目结构 :
我们的项目有4个顶级目录:
我们在根目录中也有 6个文件:
search_bing_api .py :第一步是建立一个数据集(我已经为你做过)。
encode_faces .py :使用此脚本构建面部的编码(128维向量)。
recognize_faces_image.py :识别单个图像中的人脸(根据数据集的编码)。
recognize_faces_video.py :从你的网络摄像头识别视频流中的人脸并输出视频。
recognize_faces_video_file.py :识别人脸在储存在硬盘上的人脸并输出处理后的视频。这篇文不讨论这个文件,因为原理都是一样的。
encodings.pickle:通过 encode_faces .py从数据集生成面部识别编码 ,然后序列化到硬盘。
创建图像数据集(使用 search_bing_api .py )后,我们将运行 encode_faces .py 来构建嵌入。
从那里,我们将运行识别脚本来实际识别脸部。
在我们识别图像和视频中的人脸之前,我们首先需要量化我们训练集中的人脸。请记住,我们实际上并没有在这里训练网络,网络已经接受过训练,可以在大约300万张图像的数据集上创建128维嵌入。
我们当然可以从头开始训练网络,甚至可以微调现有模型的权重,但这对于许多项目来说可能没有必要。此外,你需要大量图像来从头开始训练网络。
相反,使用预训练的网络更容易,然后使用它为我们的数据集中的每个218个人脸构建128维嵌入。
然后,在分类过程中,我们可以使用简单的k-NN模型+votes来进行最终的人脸分类。其他传统的机器学习模型也可以在这里使用。
可以访问文末链接下载encode_faces .py:
首先,我们需要导入所需的软件包。再次注意,这个脚本需要安装 imutils , face_recognition 和OpenCV。要确保你的库安装好了。
让我们来处理在运行时使用argparse处理的命令行参数 :
如果你是PyImageSearch的新手,请让我将你的注意力放在上面的代码块上,慢慢读后续,这些代码块你就慢慢熟悉了。我们正在使用argparse来解析命令行参数。当你在命令行中运行Python程序时,可以在不离开终端的情况下向脚本提供附加信息。 第2-9行不需要修改,因为它们解析来自终端的输入。如果不熟悉命令行参数可以访问下方链接。
链接:https://www.pyimagesearch.com/2018/03/12/python-argparse-command-line-arguments/
我们列出一些参数标志并讨论它们:
现在我们已经定义了我们的参数,让我们抓取数据集中文件的路径(并且执行两个初始化):
第三行使用的路径使用输入数据集目录的路径来构建其中包含的所有imagePaths的列表。
我们还需要分别在循环之前初始化两个列表, knownEncodings 和 knownNames。这两个列表将包含数据集中每个人的面部编码和对应名称(第6行和第7行)。
然后开始循环。
该循环共循环218次,对应于我们在数据集中的218张面部图像。我们在第2行中循环每个图像的路径 。
然后,在第6行从imagePath中提取该人的名字(因为我们的子目录命名恰当) 。
然后让我们加载image, 并将imagePath传递给cv2.imread(第10行)。
OpenCV使用BGR颜色通道,但 dlib 实际上需要RGB。而face_recognition 模块使用dlib,所以在继续之前,我们要交换的颜色的位置(11行),命名新的图像rgb 。
接下来,让我们定位面部并计算编码:
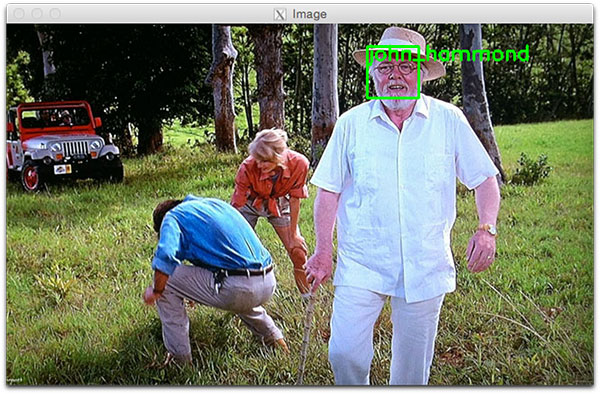
对于循环的每次迭代,我们将检测一张脸(或可能是多张脸,并假设图像中多个位置都是同一个人 - 这个假设在你自己的图像中可能成立,也可能不成立,所以在这里要小心)。
例如,假设 rgb 包含Ellie Sattler脸部的图片(或图片)。
线3和4实际查找/本地化她造成的面部列表的面孔 箱 。我们将两个参数传递给 face_recognition 。face_locations 方法:
然后,我们打算将Ellie Sattler脸上的边界框(boxes)变成128个数字的列表 (7行)。这被称为将脸部编码为矢量并且face_recognition.face_encodings 方法会为我们处理它。
从那里我们只需要将Ellie Sattler 的encoding和name附加到列表(knownEncodings和knownNames)。
我们将继续为数据集中的所有218个图像执行此操作。
如果我们不能在另一个处理识别的脚本中使用encodings,那么编码图像的意义是什么?
现在让我们来看一下:
第3行用两个键构建一个字典 - “encodings” 和 “name” 。
然后4-6行,将名称和编码转存到磁盘以供将来调用。
我应该如何在终端中运encode_faces .py脚本?
要创建我们的面部嵌入,请打开终端并执行以下命令:
从输出中可以看到,我们现在有一个名为encodings.pickle的文件 - 这个文件包含我们数据集中每个脸部的128维脸部嵌入。
在我的Titan X GPU上,处理整个数据集需要一分多钟,但如果你使用的是CPU,请准备好等待一段时间完成此脚本!
在我的Macbook Pro(无GPU)上,编码218张图像需要21分20秒。
现在我们已经为数据集中的每个图像创建了128维脸部嵌入,现在我们准备使用OpenCV,Python和深度学习识别它们。
打开recognize_faces_image.py和插入下面的代码:
这个脚本在第2-5行需要四个导入 。face_recognition模块将执行繁重的任务,OpenCV将帮助我们来加载,转换和显示处理后的图像。
我们将在第8-15行解析三个命令行参数 :
重要提示! 如果你是:
下一步,让我们加载预先计算的编码+脸部名称,然后构建输入图像的128维的脸部编码:
第3行从磁盘加载我们的pickle编码和脸部名称。稍后在实际的人脸识别步骤中我们需要这些数据。
然后,在第6行和第7行,我们加载并将输入图像转换为rgb颜色通道排序。
然后我们继续检测输入图像中的所有人脸并计算其128维编码 在 第14-16行。
现在,初始化检测到的每个人脸的名称列表 - 这个列表将在下一步中填充。
接下来,让我们循环面部编码 :
在第2行,我们开始对从输入图像中计算出来的面部编码进行循环。然后进行人脸识别!
我们尝试使用face_recognition.compare_faces将输入图像(encoding)中的每个人脸与我们已知的编码数据集(保存在data [ “encodings” ]中)进行匹配 (第6和7行)。
该函数返回True / False值的列表 ,每个值对应数据集中的每个图像。对于我们数据集中有218个图像,因此返回的列表将具有218个布尔值。
在内部, compare_faces 函数计算候选嵌入和我们数据集中所有人脸的欧几里得距离:
本质上,我们正在使用k-NN模型进行分类。
name变量将保留penson的字符串-现在,在没有“votes”(可以理解为票数)的情况下,我们把它保存为 “Unknown” (7行)。
根据我们的matches列表,我们可以计算每个名称的“votes”( 与每个名称关联的真值的数量 ),计算出votes数,并选择具有最相应votes的人的姓名:
如果 在比赛中有任何真实的votes (第2行),我们需要确定这些真值匹配的索引 。我们在第6行做了这样的工作 ,我们构建了一个简单的matchedIdx列表,其格式如下,example_01 .png:
然后我们初始化一个名为counts的字典,它将把字符名作为键,将votes作为值(第7行)。
从那里开始,让我们遍历matchedIdxs并设置与每个名称关联的值,同时根据需要在counts中增加它 。伊恩·马尔科姆的counts字典可能如下:
我们在数据集中只有41张伊恩的图片,因此40已经非常高了。
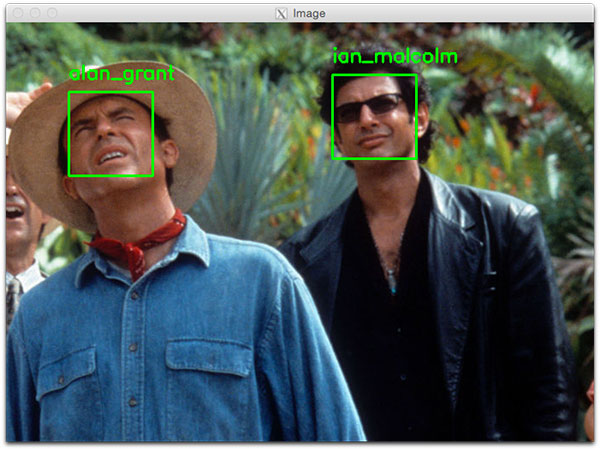
第18行从counts中提取votes最多的名称 ,在这里,它为 'ian_malcolm' 。
主要面部编码循环的循环的第二次迭代(因为在我们的示例图像中有两个面)产生以下counts:
这绝对是一个较小的vote分数,但在字典中只有一个名字,所以我们还是找到了Alan Grant。
注: PDB Python调试器用于验证counts字典的值 。
Ian Malcolm和Alan Grant都已被正确识别,因此脚本的这部分运行良好(下方有图)。
让我们继续,循环遍历每个人的边界框和标签名称,并将其绘制在输出图像上以进行可视化:
在 第2行,我们开始循环检测到的边界框(boxes )和预测的名字(name) 。为了创建一个可迭代的对象,以便我们可以轻松地循环访问这些值,我们调用zip(box, names),生成可以从中提取框的坐标和名称的元组。
在第4行,我们使用框坐标画一个绿色的矩形 。
我们还使用坐标来计算我们绘制人物名称文本的位置(第5行),然后将名称文本放在图像上(第6行和第7行)。如果脸部边框位于图像的最上方,我们需要将文本移动到方框内的顶部(在第5行处理),否则文本会消失。
然后我们继续显示图像,直到按下一个键(第10和11行)。
你应该如何运行面部识别Python脚本?
使用你的终端,首先确保你在可以正确使用workon命令的虚拟环境。
然后运行脚本,同时至少提供两个命令行参数。如果选择使用hog方法,一定要确保 --detection-method hog (否则它将默认为deep learning detector)。
要使用OpenCV和Python识别人脸,请打开终端并执行脚本:
第二个人脸识别示例如下:
现在我们已经将人脸识别应用于图像,我们也将人脸识别应用于视频(实时)。
重要的性能注意: CNN人脸识别器只能在使用GPU时实时使用(可以在CPU上使用它,但不能超过0.5 FPS,这将导致视频不稳定)。或者你应该使用HoG方法,以期有足够的速度。
下面的脚本与recognize_faces_image.py脚本相似。因因此,我只简要地介绍一下我们已经介绍过的内容,然后回顾一下视频组件,以便理解。
打开recognize_faces_image.py:
我们在第2-8行导入包 ,然后解析第11-20行的命令行参数 。
我们有四个命令行参数,其中两个和上面一样(--encodings和--detection-method)。另外两个参数是:
接着,我们加载我们的编码并启动我们的VideoStream:
要访问我们的相机,我们使用imutils的VideoStream类。 从第8行开始流。如果系统上有多个摄像头(例如内置摄像头和外部USB摄像头),则可以将src = 0更改 为src = 1等等。
稍后我们可以选择将处理后的视频帧写入磁盘,因此我们将writer初始化为None (第9行)。预留2秒以让我们的相机启动(10行)。
然后,我们启动一个while循环,并开始抓取和处理帧:
我们的循环从第2行开始, 我们的第一步是 从视频流中获取一 帧(第4行)。
上述代码块中剩余的第8-18行几乎与前一脚本中的行相同,只是这是一个视频帧而不是静态图像。也就是说,我们读取帧 ,预处理,然后检测面部边界框并计算每个边界框的编码。
接下来,让我们在我们刚刚找到的人脸编码上进行循环遍历:
在这个代码块中,我们遍历每个encodings并尝试匹配脸部。如果找到匹配项,我们会为数据集中的每个名称计算vote数。然后我们提取最高的vote数,这是与脸匹配的名字。这些与前面讨论过的脚本相同。
在下一个块中,我们对识别的人脸进行循环,然后在人脸周围绘制一个方框,并人脸上方绘制人物的名称:
这些也是相同的,所以我们来关注与视频相关的代码。
或者,我们将把帧写入磁盘,让我们看看如何使用OpenCV将视频写入磁盘:
假设我们在命令行参数中提供了输出文件路径,并且我们尚未初始化视频writer(第3行),那么要初始化它。
在 第4行,我们初始化 VideoWriter_fourcc 。FourCC是一个4字符的代码,在我们的例子中,我们将使用“MJPG”4字符代码。
然后,我们会将该对象连同我们的输出文件路径,每秒帧数目以及帧尺寸(第5和6行)一起传递到 VideoWriter。
最后,如果writer存在,我们可以继续写一个帧到磁盘(10-11行)。
让我们来处理是否应该在屏幕上显示人脸识别视频帧:
如果我们显示的命令行参数设置,我们就会继续显示框架(4行),并检查是否退出键( “Q” )是否被按下(5-8行),如果按下,跳出循环(9行)。
最后,让我们执行内务管理:
在2-7行中,我们清理并释放显示,视频流和视频编写器。
为了演示使用OpenCV和Python实时进行人脸识别,请打开终端并执行以下命令:
你可以在下面找到我录制的输出示例视频,演示面部识别系统的实际应用:
[video width="640" height="360" mp4="https://www.atyun.com/uploadfile/2018/06/Face-Recognition-with-OpenCV-Python-and-Deep-Learning-Demo-1.mp4"][/video]
recognize_faces_video_file.py文件基本上与我们刚刚为网络摄像头所查看的文件相同,只是它会采用输入视频文件并根据需要生成输出视频文件。
我将我们的脸部识别代码应用于侏罗纪公园电影中的“午餐场景”:
结果如下:
[video width="640" height="352" mp4="https://www.atyun.com/uploadfile/2018/06/Face-Recognition-with-OpenCV-Python-and-Deep-Learning-Demo-2.mp4"][/video]
注: 回想一下,我们的模型接受了十个演员的训练,因此其他人脸被标记为Unknown。这种行为是目的是为了表明我们的面部识别系统能够识别它训练过的人脸,而把它不能识别的人脸标记为Unknown。
在下面的视频中,我将《侏罗纪公园》和《侏罗纪世界》的精彩片段剪辑到一起,主要来自预告片:
[video width="640" height="360" mp4="https://www.atyun.com/uploadfile/2018/06/Face-Recognition-with-OpenCV-Python-and-Deep-Learning-Demo-3.mp4"][/video]
我可以在树莓派上使用这个人脸识别吗?
也可以。但如前所述有一些限制。
未来,我会讨论如何在树莓派上运行人脸识别,敬请期待!
下载:https://www.pyimagesearch.com/2018/06/18/face-recognition-with-opencv-python-and-deep-learning/
使用OpenCV,Python和深度学习进行人脸识别
我们首先简要讨论基于深度学习的面部识别是如何工作的,包括“深度度量学习”的概念。
然后,我会教你安装执行人脸识别所需的库。
最后,我们将为静态图像和视频流实施人脸识别。
没错,我们的人脸识别实现能够实时运行。
理解深度学习人脸识别嵌入
那么,深度学习+人脸识别是如何工作的?
它的核心是一种称为深度度量学习(deep metric learning)的技术。
如果你有深度学习的经验,就会知道我们通常会训练一个网络来:
- 接受一个输入图像
- 然后输出该图像的分类或标签
但是,深度度量学习不同。
它并不试图输出单个标签(甚至不输出图像中的对象的坐标或边界框),而是输出一个实值特征向量。
对于dlib人脸识别网络,输出特征向量是用于量化人脸的128维(即,128个实值列表)。使用triplet来训练网络:
涉及深度度量学习的面部识别包含一个triplet训练步骤。triplet包含三种不同的脸,其中两张是一个人。神经网络为人脸图像生成128维向量。如果是同一个人的脸,我们就调整神经网络权重,让矢量距离更接近。
在这里,我们向网络提供三个图像:
- 其中两幅图像是同一人的实例。
- 第三张图像是我们数据集中的一张随机人脸图像,与其他两张图像不是一个人。
以上图为例,我们提供了三个图像:一个Chad Smith和两个Will Ferrell。
我们的网络量化人脸,为每张人脸构建了128维嵌入(量化)。
然后,我们调整我们的神经网络的权重,以使两个Will Ferrell的128维的度量更接近,并远离Chad Smith。
我们用于人脸识别的网络架构基于下方论文的ResNet-34 ,但层数较少,滤波器数量减少一半。
论文:https://arxiv.org/abs/1512.03385
网络本身是由Davis King在大约300万张图像的数据集上进行训练的。在LFW数据集中,网络与其他最先进的方法进行比较,有高达99.38%的准确性。
安装你的脸部识别库
为了使用Python和OpenCV进行脸部识别,我们需要安装两个额外的库:
- dilb
- face_recognition
由Davis King维护的dlib库包含我们实现的“深度度量学习”,用于构建用于实际识别过程的人脸嵌入。
而face_recognition库由Adam Geitgey创建,围绕dilb的人脸识别功能,使其更易于使用。
在这里,我假设你的系统上安装了OpenCV。如果没有,请按下方链接教程安装。
链接:https://www.pyimagesearch.com/opencv-tutorials-resources-guides/
然后,我们安装dlib和face_recognition包。
注意: 对于以下安装,如果你使用的是虚拟环境,请确保处于Python虚拟环境中。我强烈建议虚拟环境隔离你的项目。如果你已经遵循了我的OpenCV安装指南(并安装了 virtualenv + virtualenvwrapper ),那么你可以在安装dlib和ace_recognition之前使用workon命令 。
安装不支持GPU的dlib:
如果没有GPU,则可以使用pip 安装 dlib:
$ workon # optional

$ pip install dlib
或者你可以从源代码编译:
$ workon# optional
$ git clone https://github.com/davisking/dlib.git
$ cd dlib
$ mkdir build
$ cd build
$ cmake .. -DUSE_AVX_INSTRUCTIONS=1
$ cmake --build .
$ cd ..
$ python setup.py install --yes USE_AVX_INSTRUCTIONS
安装支持GPU的dlib(可选)
如果你这样做有一个兼容CUDA的GPU可以安装 DLIB 与GPU的支持,使得面部识别速度更快,效率更高。
为此,我建议从源代码安装 dlib,因为你可以对构建有更多的控制:
$ workon# optional
$ git clone https://github.com/davisking/dlib.git
$ cd dlib
$ mkdir build
$ cd build
$ cmake .. -DDLIB_USE_CUDA=1 -DUSE_AVX_INSTRUCTIONS=1
$ cmake --build .
$ cd ..
$ python setup.py install --yes USE_AVX_INSTRUCTIONS --yes DLIB_USE_CUDA
安装face_recognition包
face_recognition模块通过一个简单的PIP命令安装:
$ workon# optional
$ pip install face_recognition
安装 imutils
你还需要imutils。可以通过pip将其安装在你的Python虚拟环境中:
$ workon# optional
$ pip install imutils
我们的脸部识别数据集
由于侏罗纪公园 (1993)是我最喜欢的电影,我们将对电影中的人物样本进行面部识别。这个数据集是在构建自定义人脸识别数据集的三种训练方法教程中构建的。 使用这个数据集的图像,我们会:
- 为数据集中的每个面创建128维的嵌入
- 使用这些嵌入来识别图像和视频流中角色的面部
人脸识别项目结构
通过检查tree命令的输出可以看到我们的项目结构 :
$ tree --filelimit 10 --dirsfirst

.

├── dataset

│   ├── alan_grant [22 entries]

│   ├── claire_dearing [53 entries]

│   ├── ellie_sattler [31 entries]

│   ├── ian_malcolm [41 entries]

│   ├── john_hammond [36 entries]

│   └── owen_grady [35 entries]

├── examples

│   ├── example_01.png

│   ├── example_02.png

│   └── example_03.png

├── output

│   └── lunch_scene_output.avi

├── videos

│   └── lunch_scene.mp4

├── search_bing_api.py

├── encode_faces.py

├── recognize_faces_image.py

├── recognize_faces_video.py

├── recognize_faces_video_file.py

└── encodings.pickle


10 directories, 11 files
我们的项目有4个顶级目录:
- dataset/ :包含根据各自名称命名的子目录中的六个角色的脸部图像。
- examples/:具有三个不在数据集中的用于测试的面部图像。
- output/:这是存储处理过的人脸识别视频的地方。我将其中一个视频放在文件夹 - 它是电影经典的“lunch scene”(午餐场景)中 。
- videos/:输入视频应存储在此文件夹中。该文件夹也包含“lunch scene”视频,但这个视频尚未经过我们的人脸识别系统。
我们在根目录中也有 6个文件:
search_bing_api .py :第一步是建立一个数据集(我已经为你做过)。
encode_faces .py :使用此脚本构建面部的编码(128维向量)。
recognize_faces_image.py :识别单个图像中的人脸(根据数据集的编码)。
recognize_faces_video.py :从你的网络摄像头识别视频流中的人脸并输出视频。
recognize_faces_video_file.py :识别人脸在储存在硬盘上的人脸并输出处理后的视频。这篇文不讨论这个文件,因为原理都是一样的。
encodings.pickle:通过 encode_faces .py从数据集生成面部识别编码 ,然后序列化到硬盘。
创建图像数据集(使用 search_bing_api .py )后,我们将运行 encode_faces .py 来构建嵌入。
从那里,我们将运行识别脚本来实际识别脸部。
使用OpenCV和深度学习对脸部进行编码
在我们识别图像和视频中的人脸之前,我们首先需要量化我们训练集中的人脸。请记住,我们实际上并没有在这里训练网络,网络已经接受过训练,可以在大约300万张图像的数据集上创建128维嵌入。
我们当然可以从头开始训练网络,甚至可以微调现有模型的权重,但这对于许多项目来说可能没有必要。此外,你需要大量图像来从头开始训练网络。
相反,使用预训练的网络更容易,然后使用它为我们的数据集中的每个218个人脸构建128维嵌入。
然后,在分类过程中,我们可以使用简单的k-NN模型+votes来进行最终的人脸分类。其他传统的机器学习模型也可以在这里使用。
可以访问文末链接下载encode_faces .py:
# import the necessary packages

from imutils import paths

import face_recognition

import argparse

import pickle

import cv2

import os
首先,我们需要导入所需的软件包。再次注意,这个脚本需要安装 imutils , face_recognition 和OpenCV。要确保你的库安装好了。
让我们来处理在运行时使用argparse处理的命令行参数 :
# construct the argument parser and parse the arguments

ap = argparse.ArgumentParser()

ap.add_argument("-i", "--dataset", required=True,

	help="path to input directory of faces + images")

ap.add_argument("-e", "--encodings", required=True,

	help="path to serialized db of facial encodings")

ap.add_argument("-d", "--detection-method", type=str, default="cnn",

	help="face detection model to use: either `hog` or `cnn`")

args = vars(ap.parse_args())
如果你是PyImageSearch的新手,请让我将你的注意力放在上面的代码块上,慢慢读后续,这些代码块你就慢慢熟悉了。我们正在使用argparse来解析命令行参数。当你在命令行中运行Python程序时,可以在不离开终端的情况下向脚本提供附加信息。 第2-9行不需要修改,因为它们解析来自终端的输入。如果不熟悉命令行参数可以访问下方链接。
链接:https://www.pyimagesearch.com/2018/03/12/python-argparse-command-line-arguments/
我们列出一些参数标志并讨论它们:
- - dataset :我们数据集的路径。
- --encodings:我们的脸部编码被写入该参数指向的文件。
- --detection-method:在我们可以在图像中对脸部进行编码之前 ,我们首先需要检测它们。两种人脸检测方法包括hog或cnn 。只有这两个标志适用于--detection-method 。
现在我们已经定义了我们的参数,让我们抓取数据集中文件的路径(并且执行两个初始化):
# grab the paths to the input images in our dataset

print("[INFO] quantifying faces...")

imagePaths = list(paths.list_images(args["dataset"]))


# initialize the list of known encodings and known names

knownEncodings = []

knownNames = []
第三行使用的路径使用输入数据集目录的路径来构建其中包含的所有imagePaths的列表。
我们还需要分别在循环之前初始化两个列表, knownEncodings 和 knownNames。这两个列表将包含数据集中每个人的面部编码和对应名称(第6行和第7行)。
然后开始循环。
# loop over the image paths

for (i, imagePath) in enumerate(imagePaths):

	# extract the person name from the image path

	print("[INFO] processing image {}/{}".format(i + 1,

		len(imagePaths)))

	name = imagePath.split(os.path.sep)[-2]


	# load the input image and convert it from BGR (OpenCV ordering)

	# to dlib ordering (RGB)

	image = cv2.imread(imagePath)

	rgb = cv2.cvtColor(image, cv2.COLOR_BGR2RGB)
该循环共循环218次,对应于我们在数据集中的218张面部图像。我们在第2行中循环每个图像的路径 。
然后,在第6行从imagePath中提取该人的名字(因为我们的子目录命名恰当) 。
然后让我们加载image, 并将imagePath传递给cv2.imread(第10行)。
OpenCV使用BGR颜色通道,但 dlib 实际上需要RGB。而face_recognition 模块使用dlib,所以在继续之前,我们要交换的颜色的位置(11行),命名新的图像rgb 。
接下来,让我们定位面部并计算编码:
	# detect the (x, y)-coordinates of the bounding boxes

	# corresponding to each face in the input image

	boxes = face_recognition.face_locations(rgb,

		model=args["detection_method"])


	# compute the facial embedding for the face

	encodings = face_recognition.face_encodings(rgb, boxes)


	# loop over the encodings

	for encoding in encodings:

		# add each encoding + name to our set of known names and

		# encodings

		knownEncodings.append(encoding)

		knownNames.append(name)
对于循环的每次迭代,我们将检测一张脸(或可能是多张脸,并假设图像中多个位置都是同一个人 - 这个假设在你自己的图像中可能成立,也可能不成立,所以在这里要小心)。
例如,假设 rgb 包含Ellie Sattler脸部的图片(或图片)。
线3和4实际查找/本地化她造成的面部列表的面孔 箱 。我们将两个参数传递给 face_recognition 。face_locations 方法:
- rgb:我们的RGB图像。
- model: cnn 或 hog (该值包含在与 “detection_method” 键关联的命令行参数字典中 )。CNN方法更精确但速度更慢。HOG速度更快但不够准确。
然后,我们打算将Ellie Sattler脸上的边界框(boxes)变成128个数字的列表 (7行)。这被称为将脸部编码为矢量并且face_recognition.face_encodings 方法会为我们处理它。
从那里我们只需要将Ellie Sattler 的encoding和name附加到列表(knownEncodings和knownNames)。
我们将继续为数据集中的所有218个图像执行此操作。
如果我们不能在另一个处理识别的脚本中使用encodings,那么编码图像的意义是什么?
现在让我们来看一下:
# dump the facial encodings + names to disk

print("[INFO] serializing encodings...")

data = {"encodings": knownEncodings, "names": knownNames}

f = open(args["encodings"], "wb")

f.write(pickle.dumps(data))

f.close()
第3行用两个键构建一个字典 - “encodings” 和 “name” 。
然后4-6行,将名称和编码转存到磁盘以供将来调用。
我应该如何在终端中运encode_faces .py脚本?
要创建我们的面部嵌入,请打开终端并执行以下命令:
$ python encode_faces.py --dataset dataset --encodings encodings.pickle

[INFO] quantifying faces...

[INFO] processing image 1/218

[INFO] processing image 2/218

[INFO] processing image 3/218

...

[INFO] processing image 216/218

[INFO] processing image 217/218

[INFO] processing image 218/218

[INFO] serializing encodings...

$ ls -lh encodings*

-rw-r--r--@ 1 adrian  staff   234K May 29 13:03 encodings.pickle
从输出中可以看到,我们现在有一个名为encodings.pickle的文件 - 这个文件包含我们数据集中每个脸部的128维脸部嵌入。
在我的Titan X GPU上,处理整个数据集需要一分多钟,但如果你使用的是CPU,请准备好等待一段时间完成此脚本!
在我的Macbook Pro(无GPU)上,编码218张图像需要21分20秒。
识别图像中的脸部
现在我们已经为数据集中的每个图像创建了128维脸部嵌入,现在我们准备使用OpenCV,Python和深度学习识别它们。
打开recognize_faces_image.py和插入下面的代码:
# import the necessary packages

import face_recognition

import argparse

import pickle

import cv2


# construct the argument parser and parse the arguments

ap = argparse.ArgumentParser()

ap.add_argument("-e", "--encodings", required=True,

	help="path to serialized db of facial encodings")

ap.add_argument("-i", "--image", required=True,

	help="path to input image")

ap.add_argument("-d", "--detection-method", type=str, default="cnn",

	help="face detection model to use: either `hog` or `cnn`")

args = vars(ap.parse_args())
这个脚本在第2-5行需要四个导入 。face_recognition模块将执行繁重的任务,OpenCV将帮助我们来加载,转换和显示处理后的图像。
我们将在第8-15行解析三个命令行参数 :
- --encodings:包含我们脸部编码的pickle文件的路径。
- --image:这是正在进行人脸识别的图像。
- --detection-method:现在你应该熟悉这个方法了- 根据系统的性能选择使用hog或cnn方法。为了速度,选择hog,为了准确,选择cnn 。
重要提示! 如果你是:
- 在CPU上运行人脸识别代码
- 或者你使用树莓派
- ......你要把--detection-method设置为hog,因为CNN人脸检测器没有GPU很慢,并且树莓派没有足够的内存来运行任意的CNN。
下一步,让我们加载预先计算的编码+脸部名称,然后构建输入图像的128维的脸部编码:
# load the known faces and embeddings

print("[INFO] loading encodings...")

data = pickle.loads(open(args["encodings"], "rb").read())


# load the input image and convert it from BGR to RGB

image = cv2.imread(args["image"])

rgb = cv2.cvtColor(image, cv2.COLOR_BGR2RGB)


# detect the (x, y)-coordinates of the bounding boxes corresponding

# to each face in the input image, then compute the facial embeddings

# for each face

print("[INFO] recognizing faces...")

boxes = face_recognition.face_locations(rgb,

	model=args["detection_method"])

encodings = face_recognition.face_encodings(rgb, boxes)


# initialize the list of names for each face detected

names = []
第3行从磁盘加载我们的pickle编码和脸部名称。稍后在实际的人脸识别步骤中我们需要这些数据。
然后,在第6行和第7行,我们加载并将输入图像转换为rgb颜色通道排序。
然后我们继续检测输入图像中的所有人脸并计算其128维编码 在 第14-16行。
现在,初始化检测到的每个人脸的名称列表 - 这个列表将在下一步中填充。
接下来,让我们循环面部编码 :
# loop over the facial embeddings

for encoding in encodings:

	# attempt to match each face in the input image to our known

	# encodings

	matches = face_recognition.compare_faces(data["encodings"],

		encoding)

	name = "Unknown"
在第2行,我们开始对从输入图像中计算出来的面部编码进行循环。然后进行人脸识别!
我们尝试使用face_recognition.compare_faces将输入图像(encoding)中的每个人脸与我们已知的编码数据集(保存在data [ “encodings” ]中)进行匹配 (第6和7行)。
该函数返回True / False值的列表 ,每个值对应数据集中的每个图像。对于我们数据集中有218个图像,因此返回的列表将具有218个布尔值。
在内部, compare_faces 函数计算候选嵌入和我们数据集中所有人脸的欧几里得距离:
- 如果距离低于某个容差(容差越小,我们的面部识别系统将越严格),那么我们返回 True ,表示人脸匹配。
- 否则,如果距离高于容差阈值,我们将返回 False, 因为人脸不匹配。
本质上,我们正在使用k-NN模型进行分类。
name变量将保留penson的字符串-现在,在没有“votes”(可以理解为票数)的情况下,我们把它保存为 “Unknown” (7行)。
根据我们的matches列表,我们可以计算每个名称的“votes”( 与每个名称关联的真值的数量 ),计算出votes数,并选择具有最相应votes的人的姓名:
	# check to see if we have found a match

	if True in matches:

		# find the indexes of all matched faces then initialize a

		# dictionary to count the total number of times each face

		# was matched

		matchedIdxs = [i for (i, b) in enumerate(matches) if b]

		counts = {}


		# loop over the matched indexes and maintain a count for

		# each recognized face face

		for i in matchedIdxs:

			name = data["names"][i]

			counts[name] = counts.get(name, 0) + 1


		# determine the recognized face with the largest number of

		# votes (note: in the event of an unlikely tie Python will

		# select first entry in the dictionary)

		name = max(counts, key=counts.get)


	# update the list of names

	names.append(name)
如果 在比赛中有任何真实的votes (第2行),我们需要确定这些真值匹配的索引 。我们在第6行做了这样的工作 ,我们构建了一个简单的matchedIdx列表,其格式如下,example_01 .png:
(Pdb) matchedIdxs

[35, 36, 37, 38, 39, 40, 41, 42, 43, 44, 45, 46, 47, 48, 49, 50, 51, 52, 53, 54, 55, 56, 57, 58, 59, 60, 61, 62, 63, 64, 65, 66, 67, 68, 69, 71, 72, 73, 74, 75]
然后我们初始化一个名为counts的字典,它将把字符名作为键,将votes作为值(第7行)。
从那里开始,让我们遍历matchedIdxs并设置与每个名称关联的值,同时根据需要在counts中增加它 。伊恩·马尔科姆的counts字典可能如下:
(Pdb) counts

{'ian_malcolm': 40}
我们在数据集中只有41张伊恩的图片,因此40已经非常高了。
第18行从counts中提取votes最多的名称 ,在这里,它为 'ian_malcolm' 。
主要面部编码循环的循环的第二次迭代(因为在我们的示例图像中有两个面)产生以下counts:
(Pdb) counts

{'alan_grant': 5}
这绝对是一个较小的vote分数,但在字典中只有一个名字,所以我们还是找到了Alan Grant。
注: PDB Python调试器用于验证counts字典的值 。
Ian Malcolm和Alan Grant都已被正确识别,因此脚本的这部分运行良好(下方有图)。
让我们继续,循环遍历每个人的边界框和标签名称,并将其绘制在输出图像上以进行可视化:
# loop over the recognized faces

for ((top, right, bottom, left), name) in zip(boxes, names):

	# draw the predicted face name on the image

	cv2.rectangle(image, (left, top), (right, bottom), (0, 255, 0), 2)

	y = top - 15 if top - 15 > 15 else top + 15

	cv2.putText(image, name, (left, y), cv2.FONT_HERSHEY_SIMPLEX,

		0.75, (0, 255, 0), 2)


# show the output image

cv2.imshow("Image", image)

cv2.waitKey(0)
在 第2行,我们开始循环检测到的边界框(boxes )和预测的名字(name) 。为了创建一个可迭代的对象,以便我们可以轻松地循环访问这些值,我们调用zip(box, names),生成可以从中提取框的坐标和名称的元组。
在第4行,我们使用框坐标画一个绿色的矩形 。
我们还使用坐标来计算我们绘制人物名称文本的位置(第5行),然后将名称文本放在图像上(第6行和第7行)。如果脸部边框位于图像的最上方,我们需要将文本移动到方框内的顶部(在第5行处理),否则文本会消失。
然后我们继续显示图像,直到按下一个键(第10和11行)。
你应该如何运行面部识别Python脚本?
使用你的终端,首先确保你在可以正确使用workon命令的虚拟环境。
然后运行脚本,同时至少提供两个命令行参数。如果选择使用hog方法,一定要确保 --detection-method hog (否则它将默认为deep learning detector)。
要使用OpenCV和Python识别人脸,请打开终端并执行脚本:
$ python recognize_faces_image.py --encodings encodings.pickle \

	--image examples/example_01.png

[INFO] loading encodings...

[INFO] recognizing faces...
Alan Grant和Ian Malcom
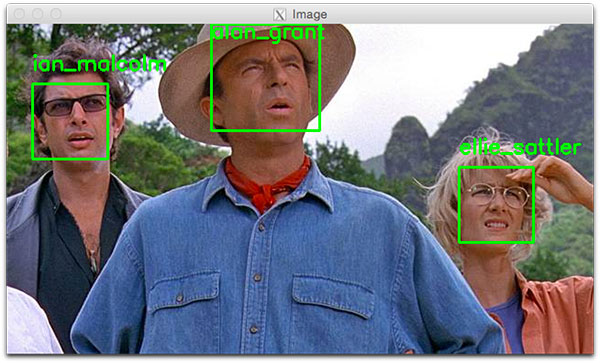
第二个人脸识别示例如下:
$ python recognize_faces_image.py --encodings encodings.pickle \

	--image examples/example_02.png

[INFO] loading encodings...

[INFO] recognizing faces...
识别视频中的脸部
现在我们已经将人脸识别应用于图像,我们也将人脸识别应用于视频(实时)。
重要的性能注意: CNN人脸识别器只能在使用GPU时实时使用(可以在CPU上使用它,但不能超过0.5 FPS,这将导致视频不稳定)。或者你应该使用HoG方法,以期有足够的速度。
下面的脚本与recognize_faces_image.py脚本相似。因因此,我只简要地介绍一下我们已经介绍过的内容,然后回顾一下视频组件,以便理解。
打开recognize_faces_image.py:
# import the necessary packages

from imutils.video import VideoStream

import face_recognition

import argparse

import imutils

import pickle

import time

import cv2


# construct the argument parser and parse the arguments

ap = argparse.ArgumentParser()

ap.add_argument("-e", "--encodings", required=True,

	help="path to serialized db of facial encodings")

ap.add_argument("-o", "--output", type=str,

	help="path to output video")

ap.add_argument("-y", "--display", type=int, default=1,

	help="whether or not to display output frame to screen")

ap.add_argument("-d", "--detection-method", type=str, default="cnn",

	help="face detection model to use: either `hog` or `cnn`")

args = vars(ap.parse_args())
我们在第2-8行导入包 ,然后解析第11-20行的命令行参数 。
我们有四个命令行参数,其中两个和上面一样(--encodings和--detection-method)。另外两个参数是:
- --output :输出视频的路径。
- --display:指示脚本将画面显示在屏幕上的标志。值1显示,值0不显示。
接着,我们加载我们的编码并启动我们的VideoStream:
# load the known faces and embeddings

print("[INFO] loading encodings...")

data = pickle.loads(open(args["encodings"], "rb").read())


# initialize the video stream and pointer to output video file, then

# allow the camera sensor to warm up

print("[INFO] starting video stream...")

vs = VideoStream(src=0).start()

writer = None

time.sleep(2.0)
要访问我们的相机,我们使用imutils的VideoStream类。 从第8行开始流。如果系统上有多个摄像头(例如内置摄像头和外部USB摄像头),则可以将src = 0更改 为src = 1等等。
稍后我们可以选择将处理后的视频帧写入磁盘,因此我们将writer初始化为None (第9行)。预留2秒以让我们的相机启动(10行)。
然后,我们启动一个while循环,并开始抓取和处理帧:
# loop over frames from the video file stream

while True:

	# grab the frame from the threaded video stream

	frame = vs.read()


	# convert the input frame from BGR to RGB then resize it to have

	# a width of 750px (to speedup processing)

	rgb = cv2.cvtColor(frame, cv2.COLOR_BGR2RGB)

	rgb = imutils.resize(frame, width=750)

	r = frame.shape[1] / float(rgb.shape[1])


	# detect the (x, y)-coordinates of the bounding boxes

	# corresponding to each face in the input frame, then compute

	# the facial embeddings for each face

	boxes = face_recognition.face_locations(rgb,

		model=args["detection_method"])

	encodings = face_recognition.face_encodings(rgb, boxes)

	names = []
我们的循环从第2行开始, 我们的第一步是 从视频流中获取一 帧(第4行)。
上述代码块中剩余的第8-18行几乎与前一脚本中的行相同,只是这是一个视频帧而不是静态图像。也就是说,我们读取帧 ,预处理,然后检测面部边界框并计算每个边界框的编码。
接下来,让我们在我们刚刚找到的人脸编码上进行循环遍历:
	# loop over the facial embeddings

	for encoding in encodings:

		# attempt to match each face in the input image to our known

		# encodings

		matches = face_recognition.compare_faces(data["encodings"],

			encoding)

		name = "Unknown"


		# check to see if we have found a match

		if True in matches:

			# find the indexes of all matched faces then initialize a

			# dictionary to count the total number of times each face

			# was matched

			matchedIdxs = [i for (i, b) in enumerate(matches) if b]

			counts = {}


			# loop over the matched indexes and maintain a count for

			# each recognized face face

			for i in matchedIdxs:

				name = data["names"][i]

				counts[name] = counts.get(name, 0) + 1


			# determine the recognized face with the largest number

			# of votes (note: in the event of an unlikely tie Python

			# will select first entry in the dictionary)

			name = max(counts, key=counts.get)


		# update the list of names

		names.append(name)
在这个代码块中,我们遍历每个encodings并尝试匹配脸部。如果找到匹配项,我们会为数据集中的每个名称计算vote数。然后我们提取最高的vote数,这是与脸匹配的名字。这些与前面讨论过的脚本相同。
在下一个块中,我们对识别的人脸进行循环,然后在人脸周围绘制一个方框,并人脸上方绘制人物的名称:
	# loop over the recognized faces

	for ((top, right, bottom, left), name) in zip(boxes, names):

		# rescale the face coordinates

		top = int(top * r)

		right = int(right * r)

		bottom = int(bottom * r)

		left = int(left * r)


		# draw the predicted face name on the image

		cv2.rectangle(frame, (left, top), (right, bottom),

			(0, 255, 0), 2)

		y = top - 15 if top - 15 > 15 else top + 15

		cv2.putText(frame, name, (left, y), cv2.FONT_HERSHEY_SIMPLEX,

			0.75, (0, 255, 0), 2)
这些也是相同的,所以我们来关注与视频相关的代码。
或者,我们将把帧写入磁盘,让我们看看如何使用OpenCV将视频写入磁盘:
	# if the video writer is None *AND* we are supposed to write

	# the output video to disk initialize the writer

	if writer is None and args["output"] is not None:

		fourcc = cv2.VideoWriter_fourcc(*"MJPG")

		writer = cv2.VideoWriter(args["output"], fourcc, 20,

			(frame.shape[1], frame.shape[0]), True)


	# if the writer is not None, write the frame with recognized

	# faces t odisk

	if writer is not None:

		writer.write(frame)
假设我们在命令行参数中提供了输出文件路径,并且我们尚未初始化视频writer(第3行),那么要初始化它。
在 第4行,我们初始化 VideoWriter_fourcc 。FourCC是一个4字符的代码,在我们的例子中,我们将使用“MJPG”4字符代码。
然后,我们会将该对象连同我们的输出文件路径,每秒帧数目以及帧尺寸(第5和6行)一起传递到 VideoWriter。
最后,如果writer存在,我们可以继续写一个帧到磁盘(10-11行)。
让我们来处理是否应该在屏幕上显示人脸识别视频帧:
	# check to see if we are supposed to display the output frame to

	# the screen

	if args["display"] > 0:

		cv2.imshow("Frame", frame)

		key = cv2.waitKey(1) & 0xFF


		# if the `q` key was pressed, break from the loop

		if key == ord("q"):

			break
如果我们显示的命令行参数设置,我们就会继续显示框架(4行),并检查是否退出键( “Q” )是否被按下(5-8行),如果按下,跳出循环(9行)。
最后,让我们执行内务管理:
# do a bit of cleanup

cv2.destroyAllWindows()

vs.stop()


# check to see if the video writer point needs to be released

if writer is not None:

	writer.release()
在2-7行中,我们清理并释放显示,视频流和视频编写器。
为了演示使用OpenCV和Python实时进行人脸识别,请打开终端并执行以下命令:
$ python recognize_faces_video.py --encodings encodings.pickle \

	--output output/webcam_face_recognition_output.avi --display 1

[INFO] loading encodings...

[INFO] starting video stream...
你可以在下面找到我录制的输出示例视频,演示面部识别系统的实际应用:
[video width="640" height="360" mp4="https://www.atyun.com/uploadfile/2018/06/Face-Recognition-with-OpenCV-Python-and-Deep-Learning-Demo-1.mp4"][/video]
视频文件中的人脸识别
recognize_faces_video_file.py文件基本上与我们刚刚为网络摄像头所查看的文件相同,只是它会采用输入视频文件并根据需要生成输出视频文件。
我将我们的脸部识别代码应用于侏罗纪公园电影中的“午餐场景”:
$ python recognize_faces_video_file.py --encodings encodings.pickle \

	--input videos/lunch_scene.mp4 --output output/lunch_scene_output.avi \

	--display 0
结果如下:
[video width="640" height="352" mp4="https://www.atyun.com/uploadfile/2018/06/Face-Recognition-with-OpenCV-Python-and-Deep-Learning-Demo-2.mp4"][/video]
注: 回想一下,我们的模型接受了十个演员的训练,因此其他人脸被标记为Unknown。这种行为是目的是为了表明我们的面部识别系统能够识别它训练过的人脸,而把它不能识别的人脸标记为Unknown。
在下面的视频中,我将《侏罗纪公园》和《侏罗纪世界》的精彩片段剪辑到一起,主要来自预告片:
[video width="640" height="360" mp4="https://www.atyun.com/uploadfile/2018/06/Face-Recognition-with-OpenCV-Python-and-Deep-Learning-Demo-3.mp4"][/video]
我可以在树莓派上使用这个人脸识别吗?
也可以。但如前所述有一些限制。
未来,我会讨论如何在树莓派上运行人脸识别,敬请期待!
下载:https://www.pyimagesearch.com/2018/06/18/face-recognition-with-opencv-python-and-deep-learning/

欢迎关注ATYUN官方公众号
商务合作及内容投稿请联系邮箱:bd@atyun.com

广告


广告

写评论取消
回复取消