


请先登录您的atyun账户,方可使用该功能

审核通过后即可使用此功能,请耐心等待~


PyTorch 4.0版本迁移指南
2018年04月26日 由 yuxiangyu 发表
354941
0
PyTorch昨天发布了PyTorch 0.4.0版本。这个版本伴随着很多重大的更新,包括正式开始支持windows。以下为PyTorch官方为让大家使用新版PyTorch而发布的PyTorch 4.0版本迁移指南。
欢迎阅读PyTorch 0.4.0的迁移指南。在此版本中,我们引入了许多振奋人心的新功能和重要的bug修复,旨在为用户提供更好,更清晰的接口。在这个指南中,我们将介绍从以前版本迁移现有代码时最重要的变化:
- Tensor与Variable合并
- 支持0维(标量)Tensor
- 弃用volatile标记
- dtypes,devices和Numpy风格的Tensor创建函数
- 编写不限制设备的代码
合并Tensor和Variable类
torch.Tensor和torch.autograd.Variable现在是相同的类。更确切地说,torch.Tensor能够像旧版Variable一样追踪历史; Variable封装还像过去那样工作,但返回一个torch.Tensor类型的对象。这意味着你不再需要在代码中到处使用Variable封装器。
在type()的Tensor更改
还要注意,张量的type()不再反映数据类型。而是使用isinstance()或x.type()替代:
>>> x = torch.DoubleTensor([1, 1, 1])

>>> print(type(x))  # was torch.DoubleTensor

""

>>> print(x.type())  # OK: 'torch.DoubleTensor'

'torch.DoubleTensor'

>>> print(isinstance(x, torch.DoubleTensor))  # OK: True

True
autograd什么时候开始追踪历史记录?
requires_grad,autograd的主要标记,现在归属于Tensor。过去适用于Variables的规则同样适用于Tensor; 当一个操作的任何输入Tensor有requires_grad=True时,autograd开始跟踪历史记录。例如:
>>> x = torch.ones(1)  # create a tensor with requires_grad=False (default)

>>> x.requires_grad

False

>>> y = torch.ones(1)  # another tensor with requires_grad=False

>>> z = x + y

>>> # both inputs have requires_grad=False. so does the output

>>> z.requires_grad

False

>>> # then autograd won't track this computation. let's verify!

>>> z.backward()

RuntimeError: element 0 of tensors does not require grad and does not have a grad_fn

>>>

>>> # now create a tensor with requires_grad=True

>>> w = torch.ones(1, requires_grad=True)

>>> w.requires_grad

True

>>> # add to the previous result that has require_grad=False

>>> total = w + z

>>> # the total sum now requires grad!

>>> total.requires_grad

True

>>> # autograd can compute the gradients as well

>>> total.backward()

>>> w.grad

tensor([ 1.])

>>> # and no computation is wasted to compute gradients for x, y and z, which don't require grad

>>> z.grad == x.grad == y.grad == None

True
requires_grad标记
除了直接设置属性之外,你还可以使用my_tensor.requires_grad_()就地更改此标记,或者如上例所示,在创建时将其作为参数传递(默认为False),例如:
>>> existing_tensor.requires_grad_()

>>> existing_tensor.requires_grad

True

>>> my_tensor = torch.zeros(3, 4, requires_grad=True)

>>> my_tensor.requires_grad

True
那么.data呢?
.data是从Variable获取底层Tensor的主要方式。合并后,调用y = x.data仍然具有类似的语义。因此y是一个与x共享相同数据的Tensor ,它与x的计算历史无关,并且requires_grad=False。
但是,.data在某些情况下可能不太稳定。x.data的任何变化都不会被autograd跟踪,并且如果在反向传递中需要x,计算出的梯度会出错。一种更安全的替代方法是使用x.detach(),它也返回一个与requires_grad=False共享数据的Tensor,但是如果x需要反向传递,则它将使用autograd就地更改记录。
支持0维(标量)张量
在过去,索引到一个Tensor向量(1维张量)会得到一个Python数字,而索引到一个Variable向量中会得到一个尺寸为(1,)的向量!类似的反应还存在与降阶函数中,例如tensor.sum()返回一个Python数字,但variable.sum()会重新调用一个尺寸为(1,)的向量。
幸运的是,此版本在PyTorch中引入了标量(0维张量)的支持!可以使用新torch.tensor函数来创建标量(后面会对其进行更详细的解释,现在你只需将它看作PyTorch中的numpy.array)。现在你可以这样做:
>>> torch.tensor(3.1416)         # create a scalar directly

tensor(3.1416)

>>> torch.tensor(3.1416).size()  # scalar is 0-dimensional

torch.Size([])

>>> torch.tensor([3]).size()     # compare to a vector of size 1

torch.Size([1])

>>>

>>> vector = torch.arange(2, 6)  # this is a vector

>>> vector

tensor([ 2.,  3.,  4.,  5.])

>>> vector.size()

torch.Size([4])

>>> vector[3]                    # indexing into a vector gives a scalar

tensor(5.)

>>> vector[3].item()             # .item() gives the value as a Python number

5.0

>>> mysum = torch.tensor([2, 3]).sum()

>>> mysum

tensor(5)

>>> mysum.size()

torch.Size([])
累加损失
以广泛使用的模式total_loss += loss.data[0]为例。Python0.4.0之前,loss是一个封装了(1,)张量的Variable,但Python0.4.0的loss现在是一个零维的标量。索引到标量是没有意义的(现在它会给出一个警告,但在0.5.0中将是一个系统错误)。使用loss.item()可以从标量中获取Python数字。
请注意,如果您在累加损失时未将其转换为Python数字,则可能出现程序内存使用量增加的情况。这是因为上面表达式的右侧原本是一个Python浮点数,而它现在是一个零维张量。因此,总损失累加了张量和它们的梯度历史,这可能会使大的autograd 图保存比我们所需要长的时间。
弃用volatile标记
volatile标志现在已被弃用。之前,autograd不会跟踪任何涉及Variable(volatile=True)的计算。它已经被换成了一套更加灵活的上下文管理器,如:torch.no_grad(),torch.set_grad_enabled(grad_mode)等等。
>>> x = torch.zeros(1, requires_grad=True)

>>> with torch.no_grad():

...     y = x * 2

>>> y.requires_grad

False

>>>

>>> is_train = False

>>> with torch.set_grad_enabled(is_train):

...     y = x * 2

>>> y.requires_grad

False

>>> torch.set_grad_enabled(True)  # this can also be used as a function

>>> y = x * 2

>>> y.requires_grad

True

>>> torch.set_grad_enabled(False)

>>> y = x * 2

>>> y.requires_grad

False
dtypes,devices和NumPy风格的创建函数
在以前版本的PyTorch中,我们用来指定数据类型(例如float或 double),设备类型(cpu或cuda)和布局(dense或sparse)作为“tensor type”。例如,torch.cuda.sparse.DoubleTensor是Tensor类型代表了:double数据类型,使用CUDA设备,COO稀疏张量布局。
在此Python4.0版本中,我们引入torch.dtype,torch.device以及torch.layout类,允许通过NumPy的样式创建函数,以便对他们的属性进行更好的管理。
torch.dtype
以下是可用torch.dtypes(数据类型)和其相应张量类型的完整列表。
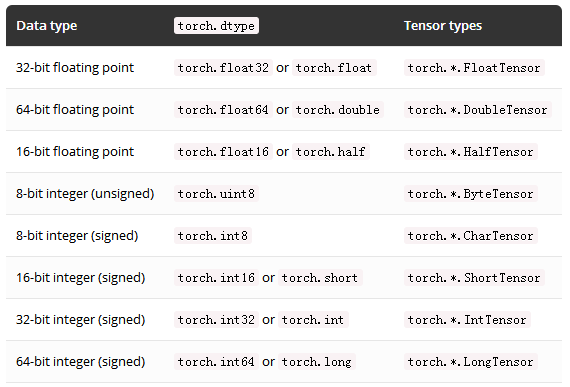
张量的dtype可以通过其dtype属性进行访问。
torch.device
torch.device包含设备类型的设备类型(cpu或cuda)和可选设备序号(id)。它可以用torch.device('{device_type}')或torch.device('{device_type}:{device_ordinal}')初始化。
如果设备序号未显示,则表示设备类型为当前设备; 例如,torch.device('cuda')等同于torch.device('cuda:X')这里的X是torch.cuda.current_device()的结果。
张量设备可以通过访问device属性了解。
torch.layout
torch.layout代表一个Tensor的数据布局。当前torch.strided(默认为稠密张量)和torch.sparse_coo(COO格式的稀疏张量)均受支持。
张量的布局可以通过layout属性进行访问。
创建Tensor
现在创建Tensor的方法还包括dtype,device,layout和requires_grad选项来指定返回Tensor所需的属性。例如:
>>> device = torch.device("cuda:1")

>>> x = torch.randn(3, 3, dtype=torch.float64, device=device)

tensor([[-0.6344,  0.8562, -1.2758],

        [ 0.8414,  1.7962,  1.0589],

        [-0.1369, -1.0462, -0.4373]], dtype=torch.float64, device='cuda:1')

>>> x.requires_grad  # default is False

False

>>> x = torch.zeros(3, requires_grad=True)

>>> x.requires_grad

True
torch.tensor(data, ...)
torch.tensor是新增张量创建方法之一。它吸收所有类型array-like数据并将其包含的值复制到新的Tensor中。如前所述,PyTorch中的torch.tensor等同于NumPy的numpy.array构造函数。与torch.*Tensor方法不同,你也可以通过这种方式创建零维(即标量)Tensor(单个python数字在torch.*Tensor 方法中被视为Size)。而且,如果dtype没有给定,它会根据数据推理出合适的dtype。这是从现有数据(比如,Python列表)创建张量的推荐方法。如下:
>>> cuda = torch.device("cuda")

>>> torch.tensor([[1], [2], [3]], dtype=torch.half, device=cuda)

tensor([[ 1],

        [ 2],

        [ 3]], device='cuda:0')

>>> torch.tensor(1)               # scalar

tensor(1)

>>> torch.tensor([1, 2.3]).dtype  # type inferece

torch.float32

>>> torch.tensor([1, 2]).dtype    # type inferece

torch.int64
我们还添加了更多的张量创建方法。其中一些为torch.*_like或tensor.new_*的变体。
- torch.*_like接受输入Tensor,而不是形状(shape)。除非另有说明,它默认返回一个与输入Tensor属性相同的Tensor:
>>> x = torch.randn(3, dtype=torch.float64)

 >>> torch.zeros_like(x)

 tensor([ 0.,  0.,  0.], dtype=torch.float64)

 >>> torch.zeros_like(x, dtype=torch.int)

 tensor([ 0,  0,  0], dtype=torch.int32)
- tensor.new_*也可以创建与tensor具有相同属性的Tensor,但它需要一个形状参数:
 >>> x = torch.randn(3, dtype=torch.float64)

 >>> x.new_ones(2)

 tensor([ 1.,  1.], dtype=torch.float64)

 >>> x.new_ones(4, dtype=torch.int)

 tensor([ 1,  1,  1,  1], dtype=torch.int32)
要指定所需的形状,可以在大多数情况下使用元组(例如torch.zeros((2, 3)))或可变参数(例如,torch.zeros(2, 3))。
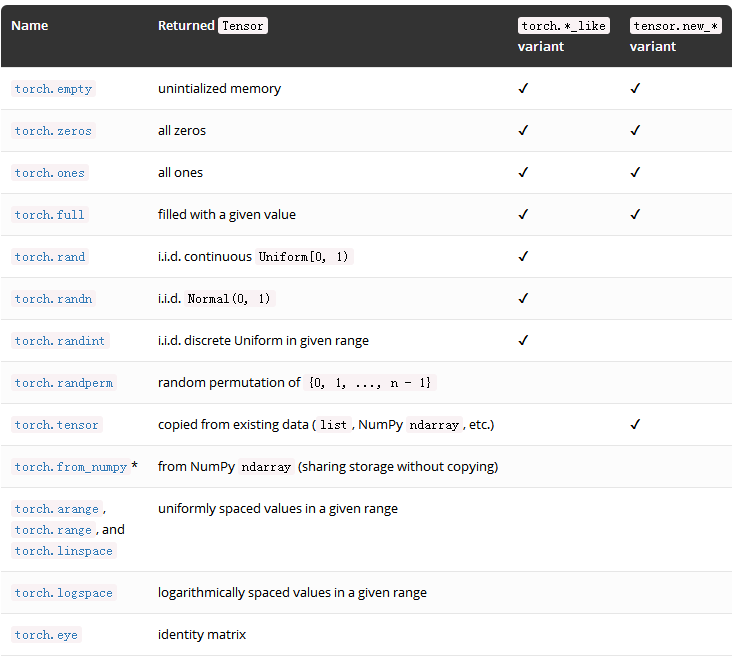
*:torch.from_numpy仅以NumPy ndarray作为输入参数。
编写不限制设备的代码
过去的PyTorch编写不限制设备的代码非常困难(即,可以在没有修改的情况下在启动CUDA和仅使用CPU的计算机上运行)。
PyTorch 0.4.0通过一下两种方式实现:
- 通过device 属性获取所有 Tensor的torch.device(get_device仅适用于CUDA张量)
- Tensor和Modules的to方法可以方便的将对象移动到不同的设备(不必在基于环境调用cpu()或cuda())
我们推荐以下模式:
# at beginning of the script

device = torch.device("cuda:0" if torch.cuda.is_available() else "cpu")


...


# then whenever you get a new Tensor or Module

# this won't copy if they are already on the desired device

input = data.to(device)

model = MyModule(...).to(device)
迁移代码实例
为了了解Python0.4.0中整体变化的况,我们来看一个Python0.3.1和Python0.4.0中常见代码模式的简单例子:
Python0.3.1(旧):
model = MyRNN()

  if use_cuda:

      model = model.cuda()


  # train

  total_loss = 0

  for input, target in train_loader:

      input, target = Variable(input), Variable(target)

      hidden = Variable(torch.zeros(*h_shape))  # init hidden

      if use_cuda:

          input, target, hidden = input.cuda(), target.cuda(), hidden.cuda()

      ...  # get loss and optimize

      total_loss += loss.data[0]


  # evaluate

  for input, target in test_loader:

      input = Variable(input, volatile=True)

      if use_cuda:

          ...

      ...
Python0.4.0(新):
# torch.device object used throughout this script

  device = torch.device("cuda" if use_cuda else "cpu")


  model = MyRNN().to(device)


  # train

  total_loss = 0

  for input, target in train_loader:

      input, target = input.to(device), target.to(device)

      hidden = input.new_zeros(*h_shape)  # has the same device & dtype as `input`

      ...  # get loss and optimize

      total_loss += loss.item()           # get Python number from 1-element Tensor


  # evaluate

  with torch.no_grad():                   # operations inside don't track history

      for input, target in test_loader:

          ...
有关更多详细信息,请参阅我们的官方文档和版本说明Python4.0迁移至南。
版本说明:https://github.com/pytorch/pytorch/releases/tag/v0.4.0

欢迎关注ATYUN官方公众号
商务合作及内容投稿请联系邮箱:bd@atyun.com


广告


广告

写评论取消
回复取消