


请先登录您的atyun账户,方可使用该功能

审核通过后即可使用此功能,请耐心等待~


使用PyTorch深度学习技术自动为图像添加字幕
2018年04月03日 由 yuxiangyu 发表
829923
0
深度学习现在发展十分迅猛,每天都会出现多种应用程序。而想要了解深度学习的最好方法就是亲自动手。尽可能尝试自己做项目。这将帮助你更深入地了解它们,并帮助你成为更好的深度学习实践者。
在本文中,我们将结合图像和文本处理来构建一个有用的深度学习应用程序,即图像字幕(Image Captioning)。它是指从图像生成文本描述的过程,主要根据图像中物体和物体的动作。例如:
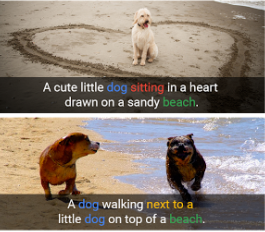
这个应用在现实生活中有很多潜在的应用场景。要注意保存图像的文本描述,以便在稍后的阶段就可以根据此描述轻松检索。
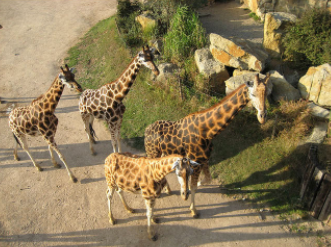
假设你看到这张照片:
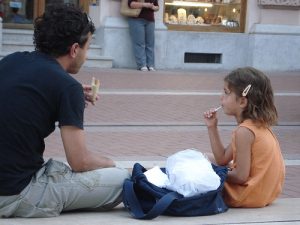
你会首先想到什么呢?也许通常人们可以想出以下几句话:
一个男人和一个女孩坐在地上吃东西。
一个男人和一个小女孩坐在人行道上,靠近一个蓝色的袋子吃东西。
一个穿着黑衬衫的男人和穿橙色连衣裙的小女孩分享一种吃的。
快速浏览一下就足以让你了解和描述图片中发生的事情。从人工系统自动生成这个文本描述就是图像字幕的任务。
任务很简单:生成的输出期望用单个句子描述图像中显示的内容,如物体的存在,它的属性,它正在进行的动作以及对象之间的交互等。但是,要在与任何其他图像处理问题一样,用人工系统复制这种行为是个极为艰巨的任务,因此我们使用复杂和先进的技术(如深度学习)来解决任务。
图像字幕的任务从逻辑上可以分为两个模块:一个是基于图像的模型,从图像中提取特征和细微差别,另一个是基于语言的模型,它将第一个模块的所给出的特征和对象转换为的自然语句。
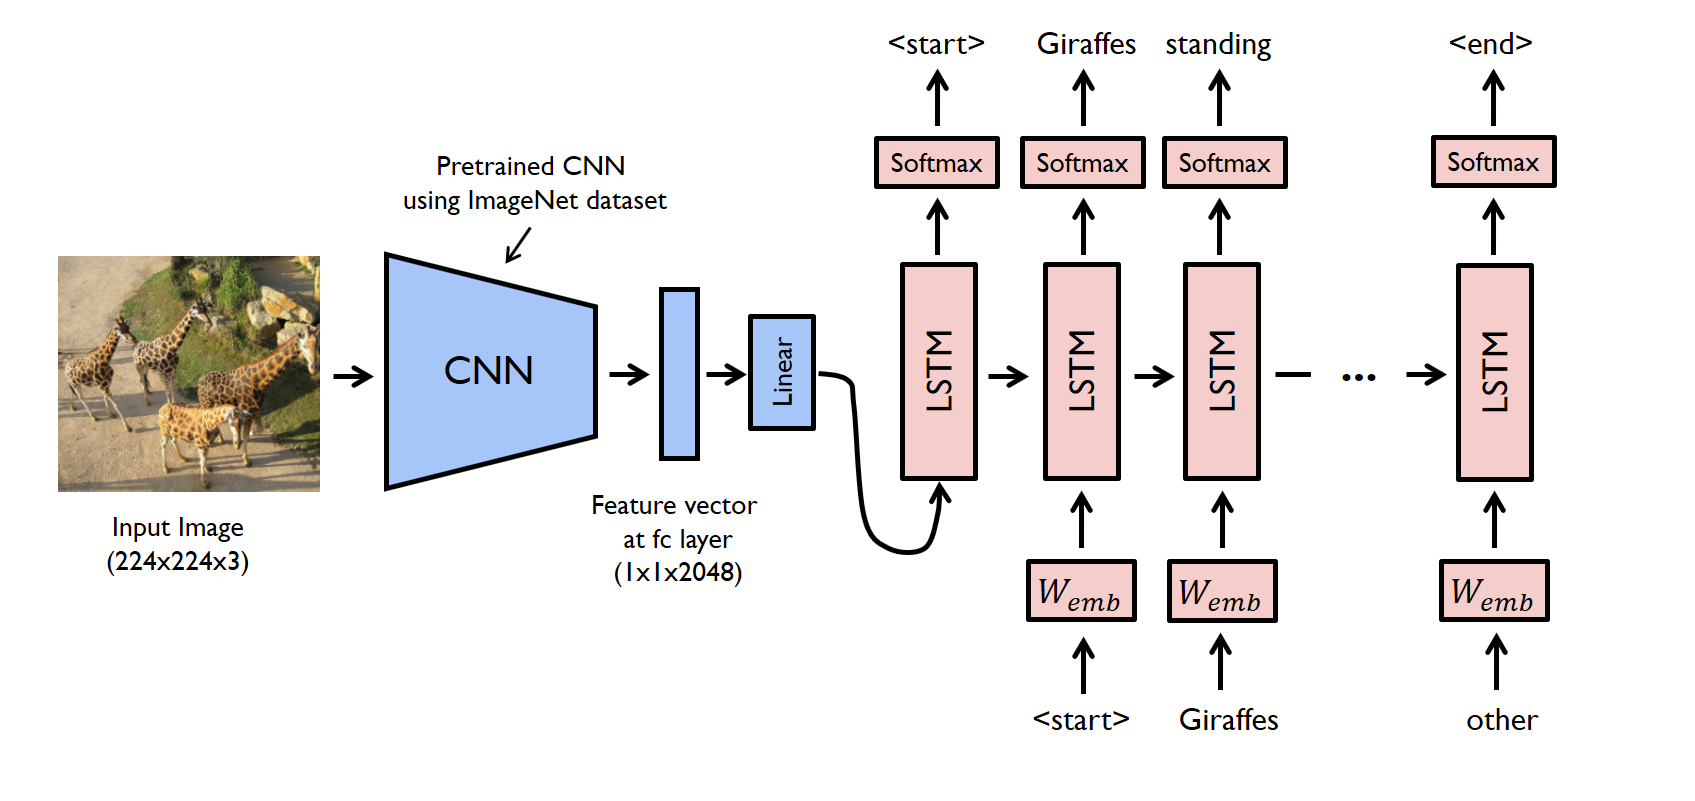
对于我们的基于图像的模型(编码器),我们通常依赖于CNN。对于我们的基于语言的模型(解码器) - 我们依赖于RNN。如下图所示:
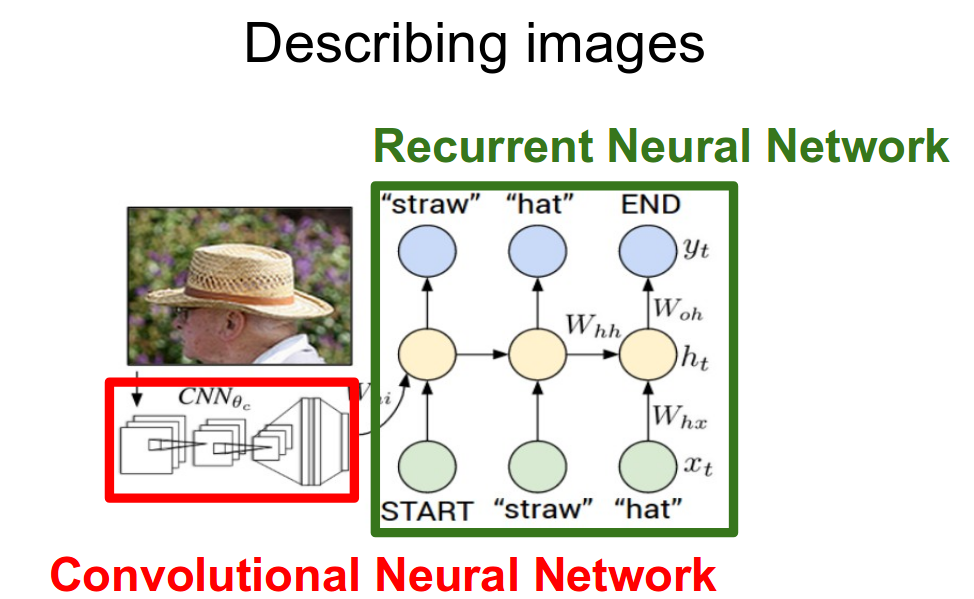
在通常情况下,预训练的CNN从我们的输入图像中提取特征。特征向量线性转换后,与RNN/LSTM网络的输入维数相同。这个网络被训练成特征向量的语言模型。
为了训练我们的LSTM模型,我们预定义了我们的标签和目标文本。例如,如果字幕是“A man and a girl sit on the ground and eat”,我们的标签和目标如下:

这样做是为了让我们的模型理解标签序列的开始和结束。
下面我将使用Pytorch进行图像字幕的实现。我们将图像作为输入,并使用深度学习模型预测其描述。
完整代码:https://github.com/yunjey/pytorch-tutorial/tree/master/tutorials/03-advanced/image_captioning
我们使用预训练的 resnet-152 模型作为编码器,而解码器是LSTM网络。
要运行本例中给出的代码,首先要必须有一个工作的python环境,最好安装了anaconda。然后运行以下命令以安装其他需要的库。
设置完系统后,应下载训练模型所需的数据集。这里我们将使用MS-COCO数据集。要自动下载数据集,可以运行以下命令:
现在你可以继续构建你的模型了。首先,你必须处理输入:
现在你可以运行以下命令开始训练模型:
只要查看并查看我们怎样在背后定义我们的模型,可以参考model.py文件中编写的代码 。
现在我们可以使用以下命令进行测试:
对于我们的示例图像,我们的模型给了我们这个输出:
我们上面看到的模型只是冰山一角。目前,图像字幕中最先进的模型是微软的CaptionBot。你可以在他们的官方网站上查看系统的演示(链接:www.captionbot.ai)。
在本文中,我们将结合图像和文本处理来构建一个有用的深度学习应用程序,即图像字幕(Image Captioning)。它是指从图像生成文本描述的过程,主要根据图像中物体和物体的动作。例如:
这个应用在现实生活中有很多潜在的应用场景。要注意保存图像的文本描述,以便在稍后的阶段就可以根据此描述轻松检索。
图像字幕需要做什么?
假设你看到这张照片:
你会首先想到什么呢?也许通常人们可以想出以下几句话:
一个男人和一个女孩坐在地上吃东西。
一个男人和一个小女孩坐在人行道上,靠近一个蓝色的袋子吃东西。
一个穿着黑衬衫的男人和穿橙色连衣裙的小女孩分享一种吃的。
快速浏览一下就足以让你了解和描述图片中发生的事情。从人工系统自动生成这个文本描述就是图像字幕的任务。
任务很简单:生成的输出期望用单个句子描述图像中显示的内容,如物体的存在,它的属性,它正在进行的动作以及对象之间的交互等。但是,要在与任何其他图像处理问题一样,用人工系统复制这种行为是个极为艰巨的任务,因此我们使用复杂和先进的技术(如深度学习)来解决任务。
解决任务的方法
图像字幕的任务从逻辑上可以分为两个模块:一个是基于图像的模型,从图像中提取特征和细微差别,另一个是基于语言的模型,它将第一个模块的所给出的特征和对象转换为的自然语句。
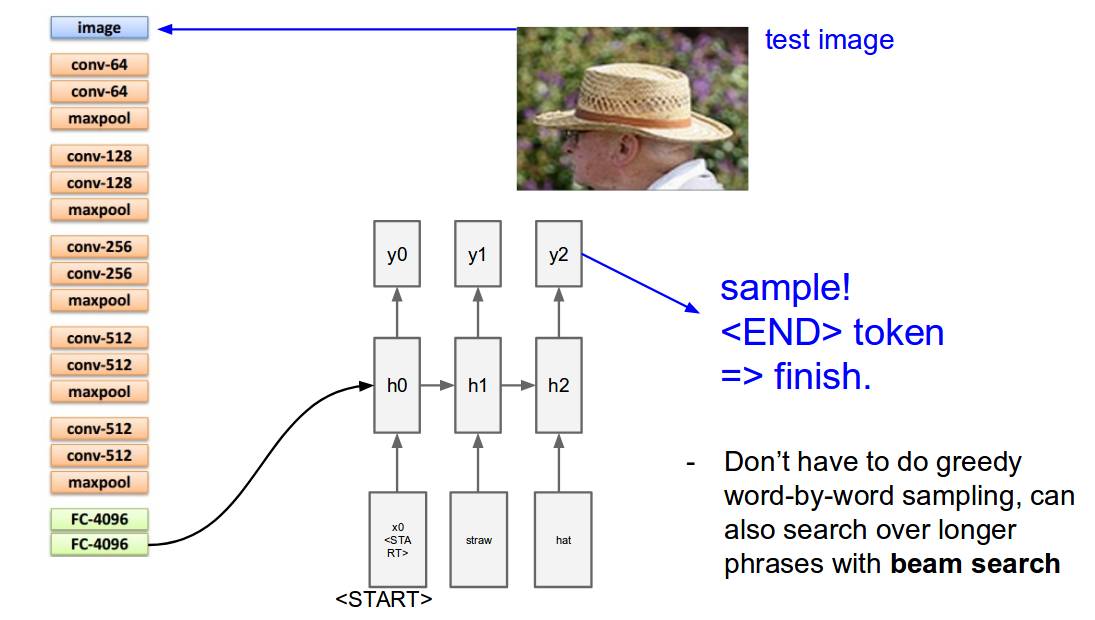
对于我们的基于图像的模型(编码器),我们通常依赖于CNN。对于我们的基于语言的模型(解码器) - 我们依赖于RNN。如下图所示:
在通常情况下,预训练的CNN从我们的输入图像中提取特征。特征向量线性转换后,与RNN/LSTM网络的输入维数相同。这个网络被训练成特征向量的语言模型。
为了训练我们的LSTM模型,我们预定义了我们的标签和目标文本。例如,如果字幕是“A man and a girl sit on the ground and eat”,我们的标签和目标如下:
这样做是为了让我们的模型理解标签序列的开始和结束。
实现
下面我将使用Pytorch进行图像字幕的实现。我们将图像作为输入,并使用深度学习模型预测其描述。
完整代码:https://github.com/yunjey/pytorch-tutorial/tree/master/tutorials/03-advanced/image_captioning
我们使用预训练的 resnet-152 模型作为编码器,而解码器是LSTM网络。
要运行本例中给出的代码,首先要必须有一个工作的python环境,最好安装了anaconda。然后运行以下命令以安装其他需要的库。
git clone https://github.com/pdollar/coco.git


cd coco/PythonAPI/

make

python setup.py build

python setup.py install


cd ../../


git clone https://github.com/yunjey/pytorch-tutorial.git

cd pytorch-tutorial/tutorials/03-advanced/image_captioning/


pip install -r requirements.txt
设置完系统后,应下载训练模型所需的数据集。这里我们将使用MS-COCO数据集。要自动下载数据集,可以运行以下命令:
chmod + x download.sh

./download.sh
现在你可以继续构建你的模型了。首先,你必须处理输入:
# Search for all the possible words in the dataset and

# build a vocabulary list

python build_vocab.py


# resize all the images to bring them to shape 224x224

python resize.py
现在你可以运行以下命令开始训练模型:
python train.py --num_epochs 10 --learning_rate 0.01
只要查看并查看我们怎样在背后定义我们的模型,可以参考model.py文件中编写的代码 。
import torch

import torch.nn as nn

import torchvision.models as models

from torch.nn.utils.rnn import pack_padded_sequence

from torch.autograd import Variable


class EncoderCNN(nn.Module):

    def __init__(self, embed_size):

        """Load the pretrained ResNet-152 and replace top fc layer."""

        super(EncoderCNN, self).__init__()

        resnet = models.resnet152(pretrained=True)

        modules = list(resnet.children())[:-1]      # delete the last fc layer.

        self.resnet = nn.Sequential(*modules)

        self.linear = nn.Linear(resnet.fc.in_features, embed_size)

        self.bn = nn.BatchNorm1d(embed_size, momentum=0.01)

        self.init_weights()


    def init_weights(self):

        """Initialize the weights."""

        self.linear.weight.data.normal_(0.0, 0.02)

        self.linear.bias.data.fill_(0)


    def forward(self, images):

        """Extract the image feature vectors."""

        features = self.resnet(images)

        features = Variable(features.data)

        features = features.view(features.size(0), -1)

        features = self.bn(self.linear(features))

        return features


class DecoderRNN(nn.Module):

    def __init__(self, embed_size, hidden_size, vocab_size, num_layers):

        """Set the hyper-parameters and build the layers."""

        super(DecoderRNN, self).__init__()

        self.embed = nn.Embedding(vocab_size, embed_size)

        self.lstm = nn.LSTM(embed_size, hidden_size, num_layers, batch_first=True)

        self.linear = nn.Linear(hidden_size, vocab_size)

        self.init_weights()


    def init_weights(self):

        """Initialize weights."""

        self.embed.weight.data.uniform_(-0.1, 0.1)

        self.linear.weight.data.uniform_(-0.1, 0.1)

        self.linear.bias.data.fill_(0)


    def forward(self, features, captions, lengths):

        """Decode image feature vectors and generates captions."""

        embeddings = self.embed(captions)

        embeddings = torch.cat((features.unsqueeze(1), embeddings), 1)

        packed = pack_padded_sequence(embeddings, lengths, batch_first=True)

        hiddens, _ = self.lstm(packed)

        outputs = self.linear(hiddens[0])

        return outputs


    def sample(self, features, states=None):

        """Samples captions for given image features (Greedy search)."""

        sampled_ids = []

        inputs = features.unsqueeze(1)

        for i in range(20):                                    # maximum sampling length

            hiddens, states = self.lstm(inputs, states)        # (batch_size, 1, hidden_size),

            outputs = self.linear(hiddens.squeeze(1))          # (batch_size, vocab_size)

            predicted = outputs.max(1)[1]

            sampled_ids.append(predicted)

            inputs = self.embed(predicted)

            inputs = inputs.unsqueeze(1)                       # (batch_size, 1, embed_size)

        sampled_ids = torch.cat(sampled_ids, 1)                # (batch_size, 20)

        return sampled_ids.squeeze()
现在我们可以使用以下命令进行测试:
python sample.py --image = ' png / example.png '
对于我们的示例图像,我们的模型给了我们这个输出:
我们上面看到的模型只是冰山一角。目前,图像字幕中最先进的模型是微软的CaptionBot。你可以在他们的官方网站上查看系统的演示(链接:www.captionbot.ai)。

欢迎关注ATYUN官方公众号
商务合作及内容投稿请联系邮箱:bd@atyun.com
广告


广告

写评论取消
回复取消